


How to Record Lync Meeting Effortlessly (2026)
Video conferencing has been a trend nowadays especially for people delving into the business world. Before, talking to a colleague out of the country or in a far location is a dilemma for a business partner. But due to amazing innovations in terms of communications and meetings, applications such as Skype and Microsoft Lync had emerged.
Although Skype has been considered as the most used platform, there are still some who resort to using Lync during team meetings and conferences. Have you ever wondered how to record Lync meetings? Well, we are to discuss the ways in this article!
Contents Guide Part 1. Best Ways to Record Your Microsoft Lync Meetings EffortlesslyPart 2. Transforming Your Recorded Lync Meeting to Another Video FormatPart 3. In Conclusion
Part 1. Best Ways to Record Your Microsoft Lync Meetings Effortlessly
If you are a business-minded individual and would always want to keep notes from every meeting you are attending via Lync, having those recorded would definitely be beneficial for you.
There would be no need to write and take notes during the call since you can immediately playback the recorded video if you missed out on anything during the live meeting! Using the methods that would be presented below will greatly help you to focus more on the actual meeting without worrying if you might miss important points and information!
Well, playback can be done with just the tip of your hand! Are you ready to find out how? Check this out!
Option 1: Recording Your Lync Meeting Using the Application’s Built-in Recorder
Having a Microsoft Lync application on your personal computer is already an advantage if you are a person who needs to attend lots of meetings and calls from time to time. Are you aware that this application also has a built-in recorder that you can make use of?
This built-in feature will let you grab a copy of your conversation with your team. Having this feature lets you capture a video in WMV format which is highly shareable with anyone! The only drawback is that this is not enabled by default.
Here are the steps needed to be performed to proceed.
Step 1 : Ensure you got this Lync application installed on your device.
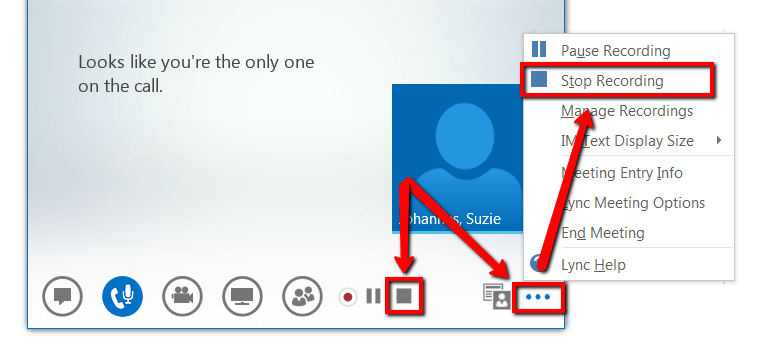
Step 2 : Once opened and the meeting has started, you would need to head to the “More Options ” button followed by selecting the “Start Recording ” menu.
Step 3 : Once you hit the recording button, there would be a window that will allow you to either pause, resume, or stop if you desire to.
Step 4 : When you are done, just tick the “Stop Recording ” button and save the video on your personal computer. You have the option as well to rename the file based on your preference.
However, there have been a lot of issues encountered by most users in utilizing this Lync built-in recorder. Here are some of those.
- The recorded video via Lync has not so good quality. The resolution is too low.
- The frame rate of the recorded video is as well low resulting in low-quality output.
- The size of the video generated is too huge and takes more space than any other file.
- The output video contains unclear images and texts.
The above disadvantages could be bothering but if you will accept the output the way it is, it would still be your choice. Here are other choices for you.
Bonus Tips: Do you know How to record a GoToMeeting session? You can click the link to learn more about the meeting recording.
Option 2: Recording Your Lync Meeting Using Professional Software Application
Another option for recording your Lync meeting is by utilizing professional software applications. One of the most popular ones is this Screen Grabber Pro. This is compatible with both Windows and Mac computers and of course, allows you to record your Lync meeting efficiently. By using this, you got the opportunity to add texts and notes though the recording is being done.
Here is how you can do to record the Lync meeting step-by-step:
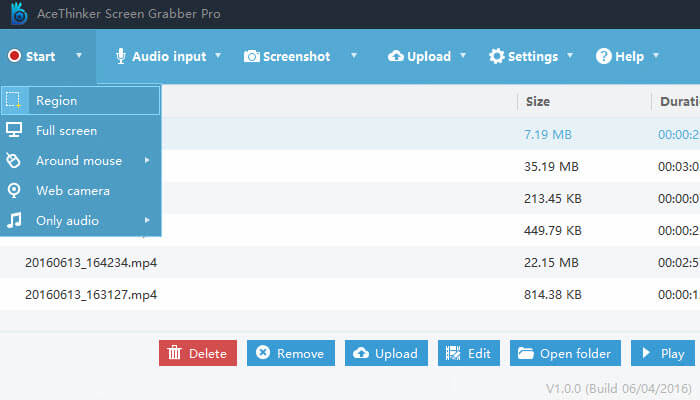
Step 1. Download and install the Screen Grabber Pro.
Step 2. Begin the meeting and the recording as well.
Step 3. Stop and save the recorded video on your personal computer.
Let us further look into the details of each.
Download and Install The Screen Grabber Pro
Of course, the first thing needed to proceed with screen recording is to ensure that you got this Screen Grabber Pro downloaded and installed on your personal computer. Once installed, you just need to open and launch the program. You will be asked as well to select the audio input mode as well as the recording mode.
Begin the Meeting and The Recording As Well
Once the meeting via Lync has started, you would just need to tick the Screen Grabber Pro’s “Record ” button to finally record your meeting. As mentioned initially, you have the option to add notes, texts, and even lines during the recording.
Stop and Save the Recorded Video on Your Personal Computer
Once the meeting has been finished, you can just hit the “Stop ” button and automatically, the output video will be saved on the software. You will just look at the list from the main interface and find the video recorded.
Option 3: Recording Your Lync Meeting Using a Free Online Tool
Well, if you would like to avoid the hassle of downloading and installing of a professional software application, a Free Online Tool would possibly fit your screen recording needs. One of the best is this Free Online Screen Recorder. You can fully access this tool in the web. Using this, you can even choose the region to record and even add some texts if you desire to.
Check these steps.
Step 1: Head to the website of this Free Online Screen Recorder.
Step 2: From the main screen, you will be seeing a button that will let you start the recording.
Step 3: You have the option to set the settings of the recording. By ticking the icon for the settings, you can easily adjust the format. You can head to the icon for audio to be able to select the input source.
Step 4: Once everything has been set, just begin the Lync recording and hit the “REC” button.
Step 5: Once the meeting is done, just click the “Stop” button to save the video.
Part 2. Transforming Your Recorded Lync Meeting to Another Video Format
Among the many tools, you can use to convert your Lync recording to any format you desire is this DumpMedia Video Converter.
This tool has been trusted and used by a lot of users in this modern era because its abilities and features have been proven to be amazing and with great results. The conversion has been made effortlessly and efficiently using this tool.
The main feature of this tool is video and audio conversion to different desired formats without quality loss, even maintaining the original look. This supports numerous formats such as the popular MP4, AVI, MOV, WMV, and a lot more! In addition, you can easily convert DVD and videos to GIF, video or audio.
This as well has editing and enhancing functions wherein you can perform adjusting of brightness, contrast, saturation, and volume control. Even adding subtitles is possible! Aside from its main function, this one is software with a user-friendly interface and offers easy steps to perform the desired processes.
Downloading and even the installation of this program could be done in just a few minutes and would require only a few clicks. You got to have your converted video or audio files by just following a few and simple steps.
Here is how to proceed with Lync recording to any format conversion:
Step 1. Download and Install DumpMedia Video Converter
Of course, you are required to ensure that this DumpMedia Video Converter would be downloaded and installed on your personal computer. As stated in the heading above, this is a tool which you can utilized offline (without an internet connection) as long as properly installed on your computer.
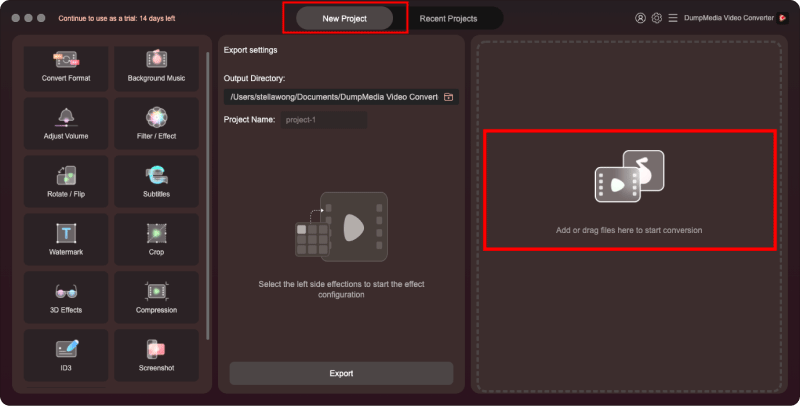
Step 2. Launch the Program and Import the Recorded Video to Be Converted
Upon finishing installation, next step would be launching the program and clicking the “Add Multiple Videos or Audios” button to select the recorded video you desire to convert. You can as well drag and drop the file directly from the location to the main interface of the application. You can select a number of files since this application supports batch conversion.
Step 3. Choose the Desired Format As the Output and Proceed with Video Conversion
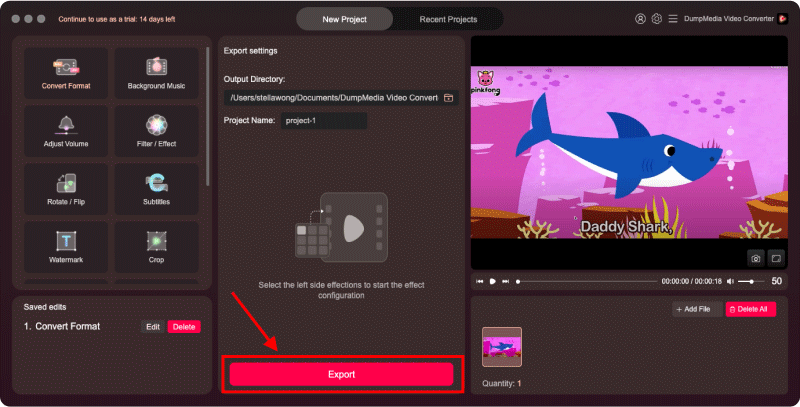
Once files have been added and imported, next would be the selection of the desired output format which you can do by ticking the “Convert Format ”. You got a lot of options you can choose from such as MP4, MOV, AVI, WAV, and many more. Make sure to select the preferred format from the list that you will see on the screen.
Once done, choose the destination folder wherein the output or converted file would be saved by clicking the “Save” button. Once everything has been set perfectly, just click the “Convert ” button to begin with the conversion process.
Once you are done with these steps, you can preview and check the converted file by tapping the “Open Folder” option. By performing just these three simple steps, you go to have your converted video in just few minutes.
Part 3. In Conclusion
This article had showed you the many ways you can do to be able to record your Lync meetings in an instant and just in simple steps. There are three efficient ways presented. You can choose one from above. Upon finishing the recording, you can also make use of this DumpMedia Video Converter to convert those to any other video formats if you prefer to!
How about letting us know your ideas and thoughts? Leave everything on below section!

30% Off >>>