


How to Rip DVD to Hard Drive on Windows/Mac
Have too many DVDs and running out of storage space for storing them? Why not rip your DVDs to your hard drive for easy management and save more space? Hard drives nowadays have large spaces for saving a multitude of files and they provide a means for you to manage your DVDs easily whether on Mac or Windows.
In this article, we are going to give you a step-by-step guide on how to rip your DVDs on your computer using Handbrake. Then we will give you our most recommended video conversion software, DumpMedia Video Converter, which you can use to convert your ripped DVDs to other formats.
But before all of these, we’ ll first discuss why you can’t copy your DVDs to your hard drive directly in the next section.
Contents GuidePart 1. Why You Can’t Copy Your DVDs to Your Hard Drive DirectlyPart 2. Steps On Ripping Your DVD To Your Hard Drive on Windows and MacPart 3. The Best Video Converter to Convert Your Ripped Videos to Other Formats
Part 1. Why You Can’t Copy Your DVDs to Your Hard Drive Directly
A lot of users encounter many problems when copying DVDs to their hard drive. So to make you understand why we have listed some of the most common problems faced by Windows and Mac users when they copy the DVDs directly to their hard drive.
#1 Mechanical Failure
When you hear grinding or clicking sounds from your hard drive, this is a sign that your hard disk is crashing. Each time you copy a DVD to a hard drive, you’ll encounter folders and files that suddenly become invisible on your computer. Moreover, every time you start copying, your screen will turn to black halfway through the process.
#2 Firmware Faults
This is among the common reasons along with manufacturer faults. Sometimes, different computer systems cannot detect the hard drive or the hard drive is not able to boot. Normally, these errors occur in new hard disks only because manufacturers were not able to test the hard disks before issuing them to customers.
#3 Corrupted Files
Your DVD might have scratches resulting in corrupted files making it very hard to copy your DVD’s contents to your hard drives. Sometimes, a power failure can also cause your files to be corrupted.
#4 Heat
If you are going to connect your hard drive to a PC or laptop, then you should make sure that they have proper ventilation as improper ventilation can cause your hard drive to crash. If your computer gets heated easily after you have started copying your DVD’s contents to your hard drive, there is a big probability that an error will follow.

Part 2. Steps On Ripping Your DVD To Your Hard Drive on Windows and Mac
Some software for ripping DVDs can cost $50 or more depending on how many features are included. While your money might be worth it if you’re managing a movie studio, an average user will be able to find almost everything they would need on a free ripping software.
There are many options you can choose from but Handbrake is preferred by most users. You can download the app and use it for free on Linux, Mac, and Windows computers. Below is a step-by-step guide on how to rip your DVDs using Handbrake.
Step 1. Scan the DVD
Step 1a. Before launching Handbrake, open the CD tray of your computer and insert the DVD.
Step 1b. Close the CD tray and launch Handbrake.
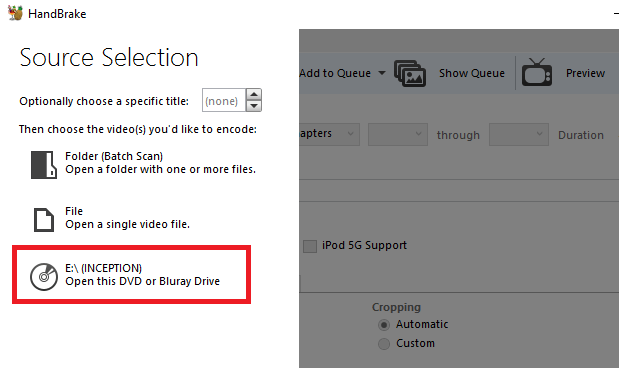
Step 1c. Once the software has loaded, a Source Selection window will appear on your screen’s left side. You can’t proceed further until you’ve selected a source.
Step 1d. Ignore the File and Folder options and click on the DVD option (the last option on the list). Wait for a few seconds while Handbrake scans your DVD’s contents. If you haven’t installed libdvdcss.dll properly, you will receive an error pop up message. Else, you will be directed to Handbrake’s Settings.
Step 2. Select Your Content
The Handbrake app allows you to select what kind of content you’d like to rip off your DVD. Make all of these adjustments under the Source section. A lot of DVDs include other contents besides the TV show or movie itself. They might have special features, interviews, deleted scenes, director’s cuts, and others.
Step 2a. You can choose the part of the DVD content that you want to rip in the Title dropdown menu. The longest one is probably the movie. But if you are ripping TV shows, you would need to rip the episodes one by one.
Step 2b. Adjust the Angles and Chapters that you’d like to retain from the corresponding drop-down buttons. DVDs are divided into chapters and angles for easier navigation. Angles are simply used for providing various versions of a single scene.
Step 2c. Change the Chapters to Seconds or Frames if you prefer using a different basis to cut your content.
Step 3. Choose Your Destination
The next thing to do is to decide the output location of your ripped videos. To save your ripped DVD to your hard drive, follow the sub-steps below.
Step 3a. Go to the Destination section and click on the Browse button.
Step 3b. Select your hard drive’s location.
Step 3c. Enter a name for your ripped video.

Step 4. Choose a Quality
On your screen’s right portion, you will notice the various Presets you can choose from. These correspond to your rip’s quality. Handbrake not only offers various general presets, but it also has presets that are device-specific.
For instance, you can select a preset that is suitable for playback on your Roku with 1080p definition or on your Chromecast. Browse through the available preset on the list and select one. Remember that if you choose higher quality, the resulting file will also have a larger size and the ripping process will take longer.
Step 5. Select Your Subtitles and Audio
At the bottom part of Handbrake’s interface, there are six tabs: Chapters, Subtitles, Audio, Video, Filters, and Picture. Video, Filters, and Picture will be automatically determined by your selected preset but you can still customize these settings further according to your preference.
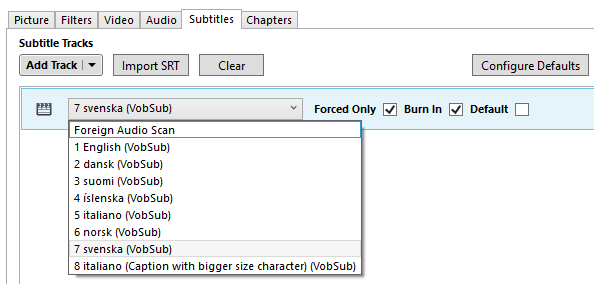
However, it is worth more of your time to spend on the Subtitles and Audio tabs. Why? Because these tabs are where you can decide which subtitles and dubs you would want to include in your ripped video. Fewer subtitles/dubs selected will make your resulting file size smaller.
The Audio tab will list the available dubs in your DVD, just add the audio version that you really need. On the Subtitles tab, you can select which subtitle file or files you want to copy whether for incorporating them on the ripped video itself or save them as standalone subtitle files.
Step 6. Start the Ripping Process
Once you are satisfied with your settings, look for the Start Encode icon on your screen’stop section and click on it to start ripping your DVD. The process can take some time depending on your DVD video’s length and the settings you have selected. If you want to check the process’ progress, just click on the Activity Log. Now you should know how to rip DVD to the hard drive, if you are interested in ripping DVD to computer, see the complete guide about how to rip DVD to computer. Next, we will give you a bonus tip to convert your ripped videos to other formats. Continue to reading to learn more.
Part 3. The Best Video Converter to Convert Your Ripped Videos to Other Formats
DumpMedia Video Converter is a powerful and high-speed all-in-one audio and video converter, downloader, editor, and player. Enjoy the convenience of a friendly interface equipped with a lot of features to meet all of your video needs. The software supports many formats including MPEG, 3GP, FLV, MKV, AVI, WMV, MOV, MP4 along other regular video formats. To convert your ripped videos to other formats you desire, download the software first and follow the steps below.
Step 1. Launch the DumpMedia Video Converter.
For Windows users :
Step 1a. Go to the Search icon (magnifying glass) beside the Windows icon in your computer’s Task Bar.
Step 1b. Type DumpMedia Video Converter on the text field.
Step 1c. Click on the DumpMedia Video Converter on the search results.
For MacOS users :
Step 1a. Click on the Launchpad icon in your computer’s Dock. The launchpad icon is a gray circle with a darker gray rocket at the center.
Step 1b. Type DumpMedia Video Converter on the Search bar at the topmost part
Step 1c. Hit the Return button on your keyboard to launch the application.
Step 2. Click the Add Files button located at the top-left section of the interface to import your files or you can drag-and-drop them directly into the main interface.
Step 3. Look for the Convert all tasks to text at the top right corner of the interface. Select your desired output format.
Step 4. At the bottom of the interface, click on the Browse button and browse your computer to the desired destination folder of the converted files.
Step 5. Click the Convert button to start the conversion of your audio file.
Step 6. Wait for the conversion to complete.

In Conclusion
With the rising number of services for streaming videos such as Netflix, the sales of DVDs are slipping. It can be assumed that DVD’s will soon be forgotten just like audio cassettes and VHS. Once this comes true, DVD players would probably follow. So before this point is reached, it is wise to rip your DVD collection into your hard drives. Through this, you can still enjoy watching your DVDs after they have long been erased from history.

30% Off >>>