


Why Does Apple Music Keep Pausing? 4 Fixes to Try
You expect the best from Apple Music. Everybody does. However, it happens. You’re relaxing and listening to some music but your Apple Music keeps pausing. You can’t even sing to it because it stops and goes and stops and goes.
It’s pausing constantly then it shows an error. That message says that you’re listening on another device when you’re not. You’re wondering what’s happening to your Apple Music.
Well, this article will show you what to do if your Apple Music keeps pausing.
Contents Guide Part 1. Why does My Apple Music Keep Pausing itself?Part 2. How to Fix Apple Music Pausing on Mac and iPhonePart 3. Bonus: Avoid Skipping, Pausing, and Crashing of Songs with DumpMediaPart 4. Conclusion
Part 1. Why does My Apple Music Keep Pausing itself?
There are a lot of reasons as to why Apple Music keeps pausing. If you’re on a share Family account, it may be that someone is actually listening to it on another device. It’s worth checking on that before you get irritated.
Another valid reason is that your Wi-Fi connection isn’t strong. Even if you’re trying to listen to it offline, your cellular data may not be working properly. That is if you’re trying to listen to it on your iPhone. If your Apple Music keeps pausing on your Mac, it could be that you had just updated your system.
Or it’s maybe you have chosen the option to listen to High-Quality Streaming. Whatever the reasons are, don’t worry. There are solutions if when your Apple Music keeps pausing on both your Mac and iPhone.

Part 2. How to Fix Apple Music Pausing on Mac and iPhone
Here are a couple of easy fixes to Apple Music that keeps on pausing.
Fix #1 For Mac: Deauthorize and Authorize Your Mac
If your Apple Music keeps pausing on your Mac, stay calm and don’t take it out on your machine. Instead, deauthorize your Mac. The steps below will show you how to do it.
Step 1. Open iTunes
Go to the Dock and look for the iTunes icon. Click on it to launch it. Then take your cursor to the top menu and click on Account.
Step 2. Go to Authorizations
Once you have clicked on Account, a drop-down menu will appear. Choose Authorizations and click on it.
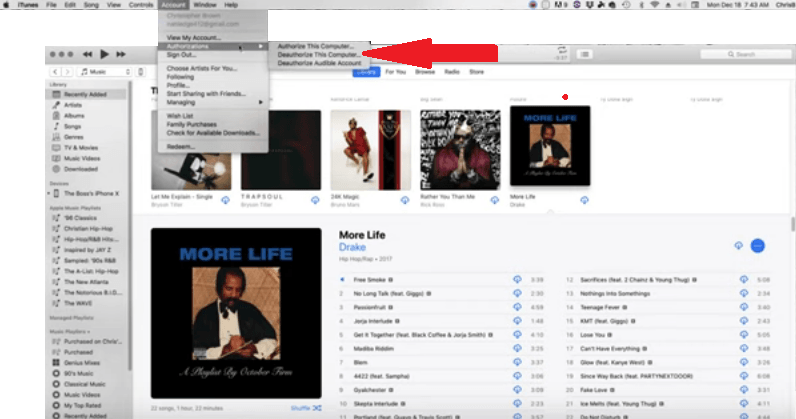
Step 3. Deauthorize Your Mac
Another drop-down menu will appear once you click on Authorizations. Select and click on Deauthorize This Computer. A pop-up window will appear where you would have to type in your username and password. Hit the Deauthorize tab.
Once you do that, a pop-up message will appear that says This computer has been successfully deauthorized. Hit on the Ok tab.
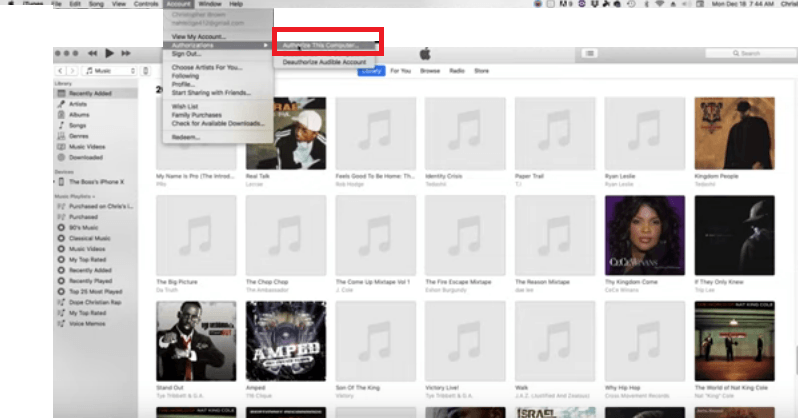
Step 4. Authorize Your Mac
You would need to authorize your Mac at this point. You will see your music disappear. Don't panic. Go back and click on Account. Choose Authorizations from the drop-down list. This time, click on Authorize This Computer. A pop-up message will appear that says Computer authorization was successful.
Now, quit iTunes and then launch it back again. It will just take a minute for all your music to come back and repopulate.
Fix #2 For iPhones and iPads: Check out Various Solutions
If your Apple Music is constantly pausing on your iPhone and iPad, try the good old fashion solution, which is to restart your device. You can also turn off your Apple Music and turn it back on again.
Another quick solution is for you to turn and off Airplane mode. If these simple solutions don’t work, check out the various solutions below for your iPhone and iPad.
Step 1. Reset all Settings
Navigate to Settings on your device and click on it. Look for General and tap on it. Scroll down and tap on Reset. Choose Reset All Settings. Type in the passcode and tap on Reset All Settings to confirm.
Step 2. Force Restart
For later models of iPhone 8 and iPads without a Home button, quickly press on the volume button and release it. Wait until you see the Apple logo by pressing and holding down the side or power button.
For iPhone 7 and 7+, hold the sleep or wake button and volume down button at the same time until you see the Apple logo.
For iPhone 6, 6+, and iPad with a Home button, press and hold the Home button and sleep or wake button at the same time until the Apple logo appears.
Step 3. Turn off High-Quality Streaming
Tap on the Settings icon and click on Music. Tap on Cellular Data. Disable High-Quality Streaming.
Step 4. Sign out and Back into Your iCloud Account
Tap on the Settings icon. Then tap on your name. Scroll down and look for Sign out. You would have to enter your Apple ID password. Once you have done so, close the Settings app and restart your device. Then on click on Settings again and sign in to your iPhone or iPad. Enter your Apple ID and password.
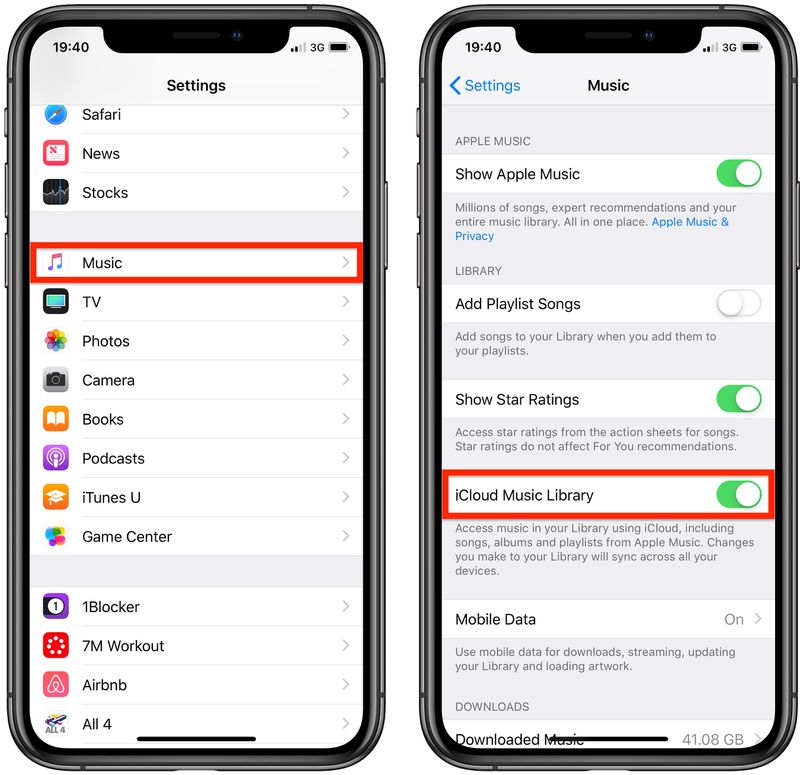
Step 5. Disable and Enable iCloud Music Library
Tap on the Settings icon. Then tap on Music. Disable the iCloud Music Library and close the Settings window. Wait for a minute and turn it back on again.
Fix #3 For Both Macs, iPhones, and iPads: Check System Status
You can do this if you’re having issues with your Apple Music on your Mac, iPhone, or iPad. The steps below will show you how:
- Launch your favorite search browser. Type in the com/support/systemstatus. Then hit Enter on your keyboard. Click on the first link that shows up on the result page.
- As you will see, the page will show you all the Apple apps. Look out for the red button because that will determine if a particular Apple app is not available.
- Look for Apple Music and see if it’s available. If it shows a green button then it’s available. If it shows a red button, then It’s not available.
Part 3. Bonus: Avoid Skipping, Pausing, and Crashing of Songs with DumpMedia
If you just want to have one suitable solution, the DumpMedia Apple Music Converter is it. With this program, you will never have to deal with your Apple Music pausing, skipping, or even crashing.
The reason for that is simple since this amazing tool help to convert and download your songs. You wouldn’t have to deal with server issues or streaming quality issues. With this particular Apple Music converter, you get to keep the quality of the songs.
As a matter of fact, you can even upgrade the sound quality on the DumpMedia Apple Music Converter. It also allows you to keep your songs on all your devices so that you could listen to them offline, without the need of cellular data.
The best of all, you can use this program during the three-month free trial. That way, you can keep all the songs and playlists that you have created without having to pay If you want to learn more about it, just have a free trial.
Part 4. Conclusion
Why deal with Apple Music pausing, skipping, and crashing when you can use the DumpMedia Apple Music Converter, right? Nonetheless, you will experience issues with your Apple Music and when you do, the solutions mentioned above can help you out.
Have you ever had issues with your Apple Music? How were you able to resolve them? We would love to hear from you.

30% Off >>>