


How to Share Friends Playlist on Apple Music (2026)
Are you a music lover? If you are, most probably, you have been paying a monthly subscription for being subscribed to certain music streaming services or websites.
Well, it could be Spotify, iTunes, or Apple Music, right? These are the best and most used by people. And, this post will focus mostly on one – Apple Music.
If you are an avid Apple music player user and subscriber, you surely have lots of playlists on your device. Ever wondered how to share a playlist on Apple Music ? If you got a friend or a family member to whom you would like your playlists to be shared, this article would be beneficial for you.
If this has been an issue or a difficulty for you ever since you are fortunate enough to have met this post this will surely answer all your questions in mind.
Contents Guide Part 1: What Is Apple Music?Part 2: How Do I Share a Playlist on Apple?Part 3: In Summary
Part 1: What Is Apple Music?
But, if you are not an Apple music lover, well, it is best to introduce this music streaming service to you first before delving into the solutions you ought to know.
Apple Music is one of the best music streaming services ever introduced to the public. As its name suggests, this was created and developed by Apple Inc. This was launched the year 2015 which allows the users to enjoy a trial period before paying the monthly subscription.
Apple Music allows you to listen to songs even if you are not connected to the internet – yes, offline playing is possible! You can also have your songs combined onto several playlists. Do you even know that this offers radio stations and enables integration with the Siri application which lets you perform commands using your voice?
Through Apple Music, you can have the ability to stream on-demand and trendy tracks and songs. This also provides recommendations based on the songs you are searching for – artificial intelligence. The monthly subscription costs 10 USD. You can enjoy a family plan for 15 USD a month and even enjoy a student plan for only 5 USD.
Apple Music is supported by the following gadgets and devices.
Devices Supporting Apple Music
- iOS devices such as iPhones
- Mac computers
- Android gadgets
- HomePods
- Apple Television
- Apple Watches
Upon knowing some basic ideas about Apple Music, let us head to the main topic of this post – the solutions you have been looking for to finally be able to share your playlists on Apple Music.
Tip: Why can't I share the playlists on Apple Music?
Part 2: How Do I Share a Playlist on Apple?
In this part of the article, we are to highlight two ways in which you can have your Apple Music playlists shared in the most efficient ways possible.
Let us begin with the first one.
Option 1: Sharing Playlists on Apple Music Using Apple Music Itself
You have read the subheading correctly, you can easily share your most-loved songs in the playlist with anyone you want to use Apple Music itself.
This is the easiest way possible. But, if you are to use this, you should keep in mind that the person to whom you wanted your playlists to be shared should also be subscribed to Apple Music.
If the above are met, you can check out any of the three ways below.
Method 1: Making Your Playlists Public
The first thing you can try to be able to share your favorite playlists with your friends or family members is to simply set or make your playlists appear in public. This only means that anyone can see those. To be able to do this, you just have to turn on the “Show on My Profile and in Search” button once you created a playlist.
Method 2: Sending Your Playlists To Anyone
Another method you can try to is to send your playlists to anyone making them accessible to them. You can send those by using transferring applications such as emails, messages, airdrop, and even using your social media accounts such as Facebook or Twitter.
To be able to do the above, you just need to follow the steps stated below.
- Open and launch your Apple Music application on your device.
- Head to your “Library” and “Playlists”.
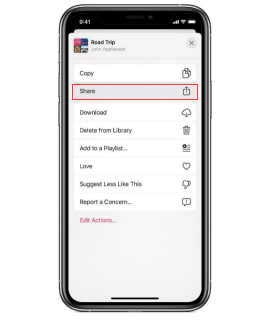
- Share the playlist by ticking the “Share” button.
Let us further dig into these three steps mentioned.
Step 1: Open And Launch Your Apple Music Application On Your Device
Of course, the initial step you should perform is to open and launch your Apple Music application on your device – either on your iPhone, iPad, or iPod Touch.
Step 2: Head To Your “Library” And “Playlists”
Once you have opened your Apple Music application, you just need to head to your “Library” and “Playlists” button to be able to see all the playlists you have created or those you have added to your library. Once you have completed this method, you can just look for the playlist you wanted to share with anyone.
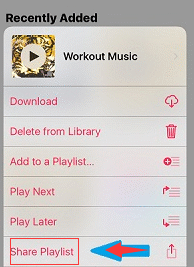
Step 3: Share The Playlist By Ticking The “Share” Button
Upon finding the playlists you intend to be shared, you can just simply tick the three-dot button followed by the “Share Playlist” button. Upon doing this, the screen will be showing the suggested options or ways you can have your playlists shared.
Method 3: Trying To Subscribe On An Apple Music Family Plan
The third method you can also try is to subscribe to an Apple Music family plan. If you have already identified specific persons to whom you wanted your playlists (and even other files) to be shared, this method could work for you. Being subscribed to a family plan enables each to simultaneously play or listen to songs anytime and anywhere. This accommodates up to six (6) devices or accounts.
The only drawback you can face on this option is that you can only have your playlists shared with five other people which somehow limits your sharing capability.
Upon doing any of the three methods discussed, you can easily have your most loved playlists shared with your friends and loved ones.
Now, the actual dilemma arises when the person who wanted to enjoy her Apple Music playlists is not subscribed to Apple Music. Well, this as well will be answered in the next part of this article.
If you are interested, make sure to keep on reading this post.
Option 2: Sharing Playlists On Apple Music By Performing Conversion
The other option you can also make use of to share your most loved Apple music playlists is to perform a conversion of playlists. Why do you need to convert your Apple Music playlists before sharing those?
Well, the reason is that the songs in Apple Music are protected by DRM (Digital Rights Management) protection. Do you have an idea of what DRM protection is?
Well, here is a basic definition for you.
What is DRM (Digital Rights Management) Protection?
FairPlay Digital Rights Management protection or popularly known as DRM protection has been created and introduced by Apple Inc. This was made to be able to avoid unauthorized transfer, copying, playing, and listening on other gadgets and devices. Materials and items which are DRM protected are considered copyrighted items that must be authenticated first.
Now that you got a basic thought of what DRM protection is, we will head to the discussion of the next option you can try to be able to share your favorite Apple music playlists.
The task has been made easier through an amazing tool that is very much capable of transforming your Apple music playlists – the DumpMedia Apple Music Converter. Let us get to know this tool more.
How to Share Playlists on Apple Music with DumpMedia Apple Music Converter
DumpMedia, being a great tool offering video and audio converters, has been a great help for many users nowadays. Aside from having amazing video/audio converting features, a Spotify Music Converter, and a video downloader, it also has an Apple Music Converter which lets you convert your favorite and most loved music to MP3 format or any other formats you desire to be highly playable in any media player!
This tool is capable of removing DRM protection and allows you to convert songs to thousands of available formats. It even lets you listen to Apple Music songs offline, and even keep your songs running although your subscription has ended! Additionally, you can also import your songs to another application like Spotify! Great, right?
Let us now take a look at how we can use this DumpMedia Apple Music Converter is a tool for easy download of your most loved Apple music playlists and how it can aid in the removal of DRM protection of such files the fastest way possible giving you a way to have those saved and eventually shared to anyone!
- Download and install DumpMedia Apple Music Converter.
- Perform adjustments on the settings of the resulting output.
- Tick the convert button to begin the process.
Let us look into these steps in detail.
Step 1: Download And Install DumpMedia Apple Music Converter
Of course, we need to ensure that DumpMedia Apple Music Converter has been downloaded and installed on your personal computer. Once installed, open and launch the program. Once the program has been launched, iTunes will also be activated. No need to worry about this just proceed with the process.
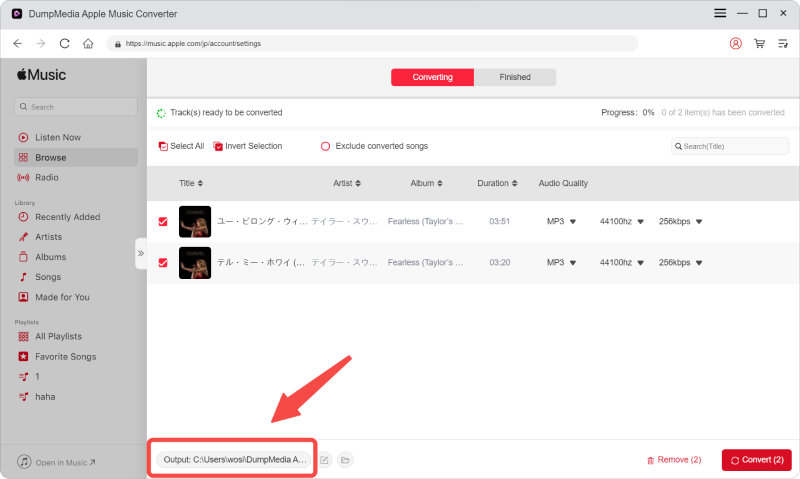
Under the “Library” menu, tick “Music” if you wanted to copy the songs you have. Once done, you will now be seeing all the songs and playlists stored on your iTunes library. To be able to choose the playlists to be downloaded and converted, you can either tick the checkboxes right next to each or make use of the search bar to easily find the playlists you wanted to be downloaded.

Step 2: Perform Adjustments On The Settings Of The Resulting Output
The next step that should be done is to perform the adjustments on the settings of the resulting output. You can choose any format from those that would be listed. The application supports many DRM-free formats including MP3. This as well supports those in AC3, M4A, M4R, AIFF, FLAC, AU, and even MKA format. Selecting any of those formats you prefer will do.
The tool will also allow you to change other options such as the bit rate and sample rate. You can as well perform the renaming of the resulting file. In this step, you would also need to specify the output path or the target location wherein the files will be saved.
Step 3: Tick The Convert Button To Begin The Process
Upon completing all the adjustments wanted for personalization or customization, the final step would now be the conversion process. You can just hit the “Convert” button which is located at the bottom right corner of the screen.

After a few minutes, your playlists will now be converted and finally downloaded. You can now enjoy those files anytime you want to! In addition to this, alongside with conversion, DRM protection will also be removed at the same time the file was transformed.
Once you have the files converted and transformed, you can just save those on your device and share it with anyone by either using transferring applications or by simply connecting their devices on your personal computer using a USB cable.
Part 3: In Summary
This post had discussed the most efficient and easiest ways you can try to be able to finally share your most loved Apple music playlists with your loved ones. If you and the person you wanted to share your playlists with are both subscribed to Apple Music, the steps are really simple.
But, if the other person has not subscribed, you would be needing a third-party application to complete the process of sharing. Well, the best and most amazing tool is this DumpMedia Apple Music Converter.
Hope this article answered your question in mind. Have you had the same problem before? Why not give this a try? If you already tried, can you share your experiences and thoughts on the below section? We would love to know your ideas in mind!

30% Off >>>