


How to Record CSGO Gameplay Efficiently
Counter-Strike: Global Offensive, known as CSGO, is a very popular game among the global community for gaming and has attracted tons of fans. CSGO allows each player to enjoy a thrilling gaming experience for hours with other players. So some gamers would want to record their gameplay so that they can share their victory moments or analyze their failure to improve their game skills.
However, recording a CSGO gameplay will not be easy as you might think it is. So to save you the hassle, we will be discussing how to record a CSGO gameplay in this article. We will give you two methods on how to do this along with a step-by-step guide for each. And if you want to convert your recorded gameplays to other formats, we will also give you our most recommended tool to help you do this: DumpMedia Video Converter.
Contents GuidePart 1. Two Methods on How to Record Your CSGO GameplayPart 2. The Best Converter Tool For Your Recorded CSGO VideosPart 3. The Bottom Line
Part 1. Two Methods on How to Record Your CSGO Gameplay
Method #1. Record CSGO Gameplay in 60 FPS Using OBS
OBS, short for Open Broadcaster Software, is an open-source and free recording and streaming program. It provides real-time device and source capture, broadcasting, recording, encoding, and scene composition. With this software, you can record your CSGO gameplays easily in 60 FPS.
The interface of OBS is arranged into five components: control panel, transitions, audio mixer, sources, and scenes. Below is the description of some of these components.
- Control Panel. The control panel contains options for stopping or starting a recording or stream, a button for transforming OBS into a Studio Mode that is more professional, a button that opens the menu for settings, and one last button for exiting the program.
- Transitions. The transition panel contains buttons for transitioning from a live scene to an inactive scene and vice versa.
- Audio Mixer. This section allows the user to mute the video’s audio, control the volume using virtual faders, and add effects by clicking on the cogwheel located at the right side of the mute button.
- Sources. It is where you add a new source for whatever you want to do with the application such as window capturing.
- Scenes. The Scenes section is a group of sources such as live and recorded video, audio, and text.
The interface can also be switched from various themes which include both light and dark themes. Below are among the notable features of this software:
- Can support the following operating systems:
- Windows 7 or later versions,
- OS X 10.8 or later versions, and
- Linux Ubuntu 14.04 of later versions.
- It allows the easy addition of new sources and the copying of existing sources.
- Allows improvement of the audio quality using its mixer.
To record your CSGO gameplays using OBS, follow the steps below.
Step 1. Install and launch the OBS application.
Step 2. Boot up your CSGO application.
Step 3. Create a source.
After launching the CSGO application, go back to the OS interface then do the following.
Step 3a. Scroll to the bottom of the application interface then right-clicks on the empty box under the Sources section.
Step 3b. Select Window Capture from the options.
Step 3c. Name the source.
Step 4. Select the window that you want to record.
From the Window dropdown button, you need to select the Counter-Strike: Global Offensive window because it is the one that you want to record then click on the OK button. You will see the CSGO window popping up in the area for recording in the OBS interface immediately.
Step 5. Configure the video settings.
Step 5a. Click on the File menu.
Step 5b. Choose Settings to open the Settings window.
Step 5c. Click on the Video option at the right panel.
Step 5d. At the Common FPS Values dropdown button, select 60.
Step 5e. Click on the Apply button the OK.
Step 6. Begin the recording process and play your game.
Finally, click on the Start Recording button and begin playing CSGO. You can always go back to the OBS interface and click on the Stop Recording button to stop the recording process.

In summary, OBS’s usage can be complicated. If you’d like to record your CSGO gameplay in high definition, you need to set a lot of settings. The discussed steps above are only the basics of recording a typical video. Some users also claim that lags happen while they’re capturing their CSGO gameplay. If this happens to you too, you can use the second method that will be discussed in the next section.
Tips : Now you have finished the recording using the OBS and you might want to enhance the video quality to get a better experience. See the best guide about how to enhance the quality of your videos.
Method #2. Record CSGO Gameplay Using Bandicam
Bandicam is among the lightweight software for screen recording purposes in Windows. It can record anything on your computer and output it in a high-quality resolution. Also, Bandicam makes the recording of a certain part of your computer screen possible. You can even capture your CSGO gameplay with it and any other games as long as they use Vulkan, OpenGL, or DirectX technologies.
Bandicam helps you carry out screen captures with a high ratio of compression while keeping your video’s quality close to the original one. It also provides performance way more superior compared to other screen capturing software that has similar functions. Basically, it can perform three different tasks:
- Screen recording. You can use Bandicam to record everything that is happening on your screen and output it in MP4 or AVI video files.
- Game recording. It is possible to capture various 2D or 3D games in 4K UHD quality with up to 144 video FPS.
- Device recording. You can also record external devices like your webcam, IPTV, smartphone, or Xbox/PlayStation.
To record your CSGO gameplays using Bandicam, follow the steps below.
Step 1. Install and launch Bandicam.
Step 2. Choose the second tile from the left to enter the mode for Game Recording. Since you are going to record a CSGO gameplay, it is advisable to use this model so that you’ll have a video file of high quality.
Step 3. Start the CSGO game and begin playing. Note that the operation will be more stable if you run Bandicam first before CSGO.
Step 4. While you are playing a game under the Game Recording mode, a green number will appear on your screen. Bandicam allows you to control the frames per second (FPS) of your recording gameplay under the tab for FPS in Bandicam’s interface.
Step 5. Press F12 on your keyboard or click on the red Rec circle button in Bandicam’s interface to begin the recording process. The green FPS number will turn to red once the recording starts.
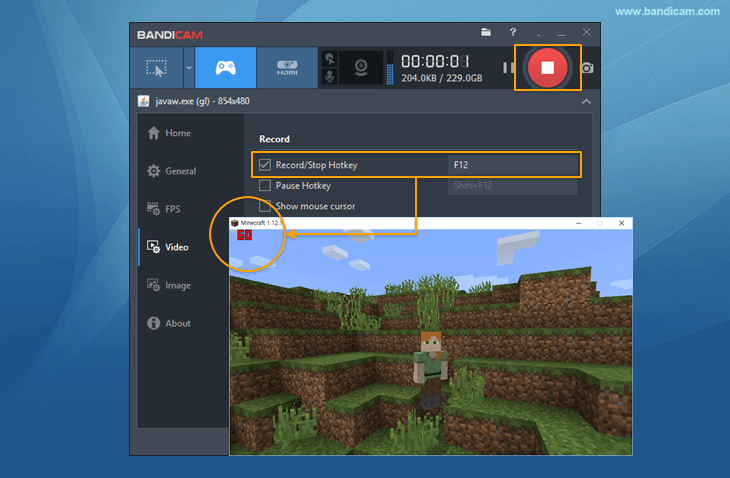
Step 6. To stop the recording process, just press F12 on your keyboard or the red Rec circle button in Bandicam’s interface again.
Step 7. If you want to Play, Edit, Upload, or Delete your recorded video, just navigate to Bandicam’s Home menu at the right panel then click on the Video tab.
Part 2. The Best Converter Tool For Your Recorded CSGO Videos
DumpMedia Video Converter is a powerful and high-speed all-in-one audio and video converter, downloader, editor, and player. Enjoy the convenience of a friendly interface equipped with a lot of features to meet all of your video needs. The software supports many formats including MPEG, 3GP, FLV, MKV, AVI, WMV, MOV, MP4 along other regular video formats. To convert your recorded CSGO gameplay to another format you desire, download the software first and follow the steps below.
Step 1. Launch the DumpMedia application.
For Windows users :
Step 1a. Go to the Search icon (magnifying glass) beside the Windows icon in your computer’s Task Bar.
Step 1b. Type DumpMedia on the text field.
Step 1c. Click on the DumpMedia application on the search results.
For MacOS users :
Step 1a. Click on the Launchpad icon in your computer’s Dock. The launchpad icon is a gray circle with a darker gray rocket at the center.
Step 1b. Type DumpMedia on the Search bar at the topmost part
Step 1c. Hit the Return button on your keyboard to launch the application.
Step 2. Click the Add Files button located at the top-left section of the interface to import your files or you can drag-and-drop them directly into the main interface.
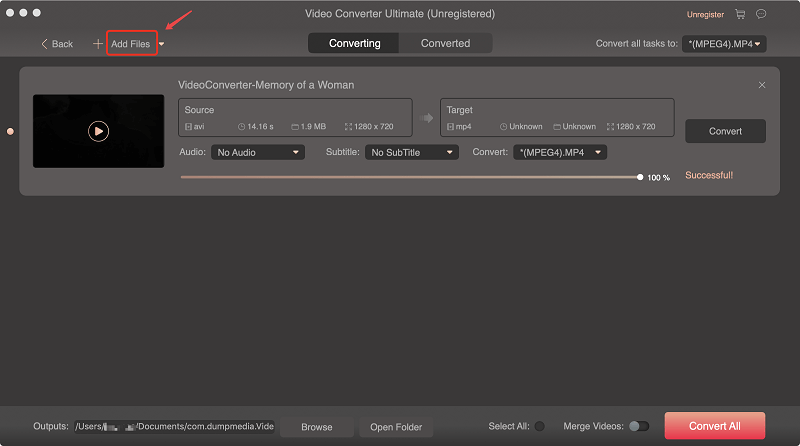
Step 3. Look for the Convert all tasks to text at the top right corner of the interface. Select your desired output format.
Step 4. At the bottom of the interface, click on the Browse button and browse your computer to the desired destination folder of the converted files.
Step 5. Click the Convert button to start the conversion of your audio file.

Step 6. Wait for the conversion to complete.
Part 3. The Bottom Line
That’s it! Now you can record your CSGO gameplays hassle-free and boast your wins to your friends by sharing your recordings to your social media. In this article, we have discussed two tools you can use to record your CSGO gameplays. And if you are not satisfied with the format that your selected CSGO screen recorder has given you, you can use DumpMedia Video Converter software to convert your recorded gameplay to your desired format.

30% Off >>>