


How to Stream Media Files from VLC Using Chromecast
VLC is not just a video player that can be used on your PCs. It is also a convenient way of sending your music or videos to your Chromecast. The use of a VLC media player with Chromecast allows the sharing of nearly all kinds of media files to your TVs in seconds.
The developers of VLC have worked on the support for Chromecast for a while, and this feature is finally made available in VLC’s 3.0 version. This means that you can now stream audio and video files using VLC through your computer on your TV via Chromecast.
In this article, we will be discussing how you can stream media files from VLC using Chromecast and the tips and alternatives you can use in case you encounter problems and the casting does not work. First, let us discuss a bit on what Chromecast is and how it works.
Contents GuidePart 1: What Is Chromecast And How Does It Work?Part 2: Important Tips Before Streaming Files From VLC To ChromecastPart 3: Streaming Videos From VLC Media Player To Your TVPart 4: Performance And Connectivity Issues Of VLC To ChromecastPart 5: In Conclusion
Part 1: What Is Chromecast And How Does It Work?
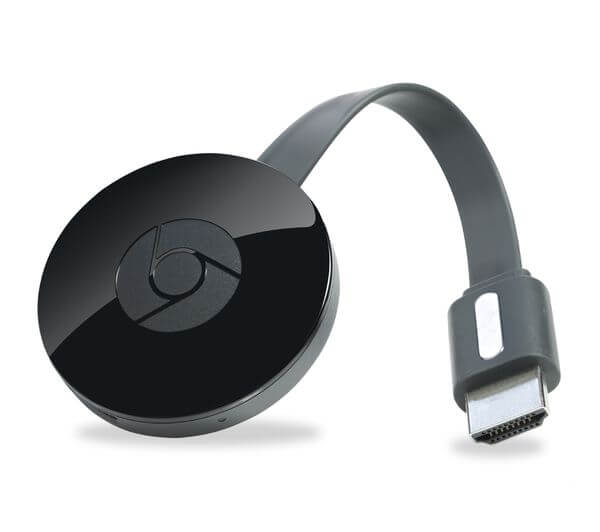
Google Chromecast is a popular device nowadays and does not need any introduction. But if you are one of those who are still not aware of Chromecast’s existence, it is a simple device used for media streaming which is worth about $35 and is used to play contents from your PC, tablet, or smartphone on the screen of your TVs.
Typically, Chromecast takes advantage of a WiFi network to display various stuff on your TV screen. But Chromecast’s Guest Mode authorizes other people to directly cast contents to your TV. Chromecast allows the streaming of both Internet-based and local content. When a cast button is pressed in an application, this conveys a message to the receiver of Chromecast regarding the content that is supposed to be streamed. Then an environment similar to Chrome is used by the receiver in streaming your desired web content.
Furthermore, the videos and songs that are streamed via Chromecast are not drawn from your devices but are instead pulled from the web source directly. This is why your device’s battery is not drained quickly while it is casting TC shows and movies.
Part 2: Important Tips Before Streaming Files From VLC To Chromecast
May it be streaming something live via VLC and forwarding the video to your High-definition TV, sending some videos to your living room’s big screen, or playing iTunes on your TV, whatever the reason is, VLC makes the connection between your computer and Chromecast easier. Before you can be able to stream videos from VLC to your television using Chromecast, you should ensure that you’ve got the following:
- VLC version 3.0 (this is available in 32-bit and 64-bit versions in Windows along with other platforms),
- Google Chromecast,
- A chromecast device, and
- Strong wireless router signal or proximity.
The chromecast device can be an Android TV such as NVIDIA SHIELD as they are able to accept streams that are Chromecast standards also. Or a TV using Android TV software such as the newer TVs of Sony. The Mac or PC you are using for streaming must be located in the local network where the Chromecast device is, whether wired or not.
The casting feature is only currently available in VLC’s 3.0 version for Mac and Windows. So you will need a Mac or Windows PC and an updated VLC version to continue. You just need to download the VLC version matching the architecture of your computer and then install it.
Also, you need to make sure that your Chromecast is powered on and is properly connected to your TV. In case you run into any problems, we have also discussed some tips on how you can fix the problem later in this article.
#1: Installing VLC Media Player On Your Computer
First, you need to download and install the application on your computer if you don’t have VLC yet. To do this, follow the steps below.
Step 1. Navigate to VLC using your favorite browser.
Step 2. At the topmost right of the webpage, look for the orange button with the words DOWNLOAD VLC written on it. Click that orange button. The webpage should be able to automatically detect the operating software of your computer to match the correct software version.
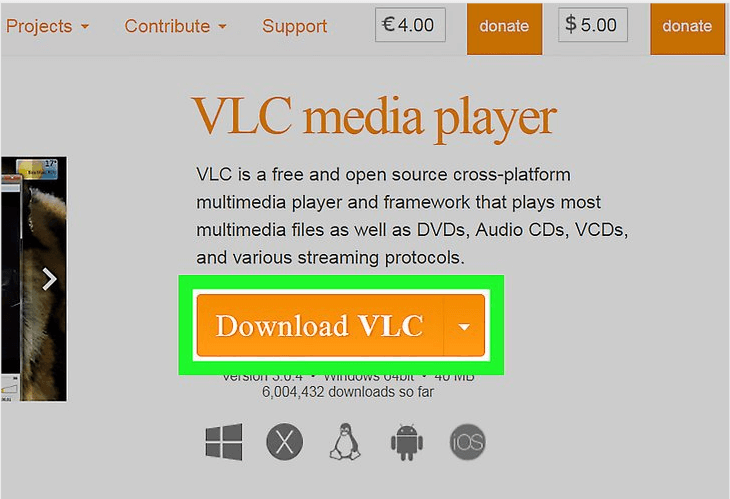
Step 3. Wait for the software to download.
Step 4. Click on the installer once the download is finished and the install wizards start.
Step 5. In a warning will appear notifying you that the publisher could not be verified, just click on the Run button.
Step 6. If the installer asks you for various permissions, just click Yes.
Step 7. Select your preferred installation language and click the OK button.
Step 8. The process of installation will start. Click the Next button to proceed to the succeeding steps.
Step 9. Read the license agreement and click on the Next button.
Step 10. Select the extra components you want to be installed. Click the Next button.
Step 11. Choose the installation location of the VLC media player then click the Install button.
Step 12. Wait for the installation process to finish.
Step 13. A confirmation window will show when the installation is completed. Click on the Finish button.
Step 14. If you checked the Run VLC media player option in the preceding step, the VLC player will automatically launch.
#2: Setting Up Your Chromecast
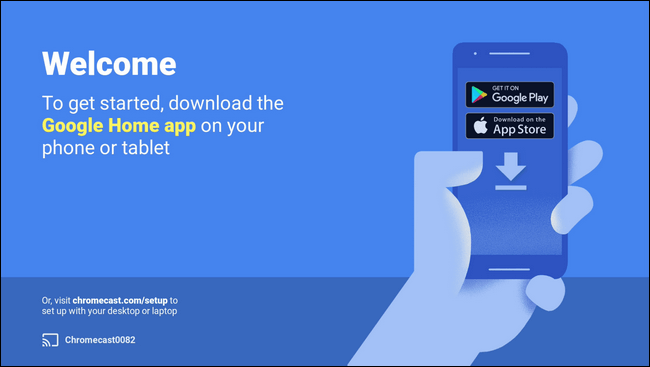
If you intend to use Chromecast in your office or home, logically, the initial step you need to do is to connect it to a local WiFi network and set it up. You cannot set up your Chromecast using a computer so you need to use an iPhone, Ipad, or Android phone. To do this, just follow the steps below.
Step 1. Plugin the Chromecast device to your TV.
Step 2. Connect the power cable USB to the Chromecast.
Step 3. Connect the other side of the power cable USB to one of your TVs free USB port or to the power adapter included with the device which you would be plugging into a power socket. You must use only the AC adapter provided.
Step 4. Connect the Chromecast device to a local WiFi network. Make sure that your Chromecast is on the same network as the tablet or mobile device you are using in setting up your Chromecast.
Step 5. Navigate to your mobile phone’s application store and download and install the Google Home application.
Step 6. Tap the Google Home application icon, which looks like an outline of a house, on your device to launch the application.
Step 7. On the application’s home screen, press on the Add icon (plus sign).
Step 8. On the choices, tap Set up device.
Step 9. Tap on Set up new devices.
Step 10. Follow the succeeding steps for setting up your Chromecast device.
#3: Connecting VLC Media Player To Your Chromecast
After downloading and installing the suitable VLC version, you are now ready to start. You will not be able to find the “Cast ” option in VLC in the beginning so you need to follow the succeeding steps to connect VLC to your chromecast.
Step 1. Make sure that both your television and Chromecast are turned on.
Step 2. Click on the Playback tab in VLC.
Step 3. Select Rendered from the options.
Step 4. Click on Scan. This starts searching for any Chromecast device on the same network. Just wait for a while.
Step 5. If you can find your Chromecast from the list already, click on it.
Now, you are ready to stream using Chromecast. Just open a media file you want to play in VLC. To do this, follow these steps:
Step 1. Click on the Media menu on VLC.
Step 2. Select the Open File option.
Step 3. From the window that will open, select your video file.
Step 4. In case notification about Performance Warning pops up and no video is being played on the Chromecast device, click on the OK button to convert your selected video to a file format readable by VLC.
Step 5. Since you are playing via a device on a network, a warning on the Insecure Site will appear. Don’t panic, this is fine. Click on View certificate.
Step 6. Click on Accept Permanently and the certificate will be added to your computer.
Step 7. Click on the OK button if you want to go on with our video or click on the OK, Don’t warn me again if you allow VLC to convert your video.
Note that this feature is not advisable to use on a laptop that is running out of battery. Similarly, slower or older PCs may not be able to convert media files fast enough, causing lags during streaming. So it is advisable to use a video converter for efficient conversion. You can use DumpMedia Video Converter which will be discussed in the next section.
#4: Converting A Video Using DumpMedia
DumpMedia Video Converter is an all-in-one video downloader, converter, editor and video enhancer software. It is a very useful tool for video download and conversion processes and you can pretty much do anything with it. Furthermore, it is easy to use and user-friendly.
In this section, we will show you a step-by-step guide on how you can convert your VLC video to your desired format.
Step 1. Launch the DumpMedia application as introduced in the steps above.
Step 2. Click the Add Files button located at the top-left section of the interface.
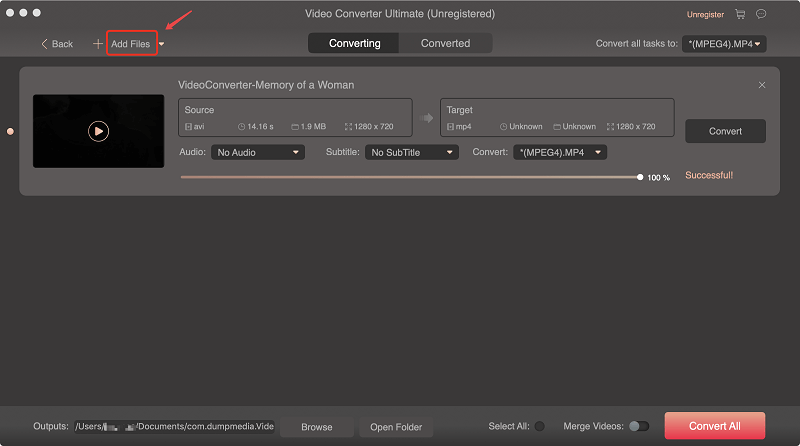
Step 3. Browse and select the files you want to convert.
Step 4. Click the "Convert all tasks to" located at the top right.
Step 5. Select your desired format.
Step 6. Browse your computer to the desired destination folder of the converted files.
Step 7. Click on the Convert button to start the conversion of your video.

Step 8. Wait for the conversion to complete.
Step 9. Click on the Download button to start downloading your video file.
Step 10. Navigate to your desired output location when a new window appears.
Step 11. Click on the Save button.
Step 12. Wait for your video to finish downloading.
Part 3: Streaming Videos From VLC Media Player To Your TV
The only thing left to do is to click Play. Your video should start to stream on your TV. Chromecast is able to stream in HD. So you can enjoy watching your favorite TV shows and movies, smartphone videos, and even streams of video games in high definition.
To control your video, just use VLC’s window from your computer to adjust the volume, pause, rewind, forward, etc. Whatever action you do to your video from VLC is going to be reflected on your television.
You can stream more videos in the future by:
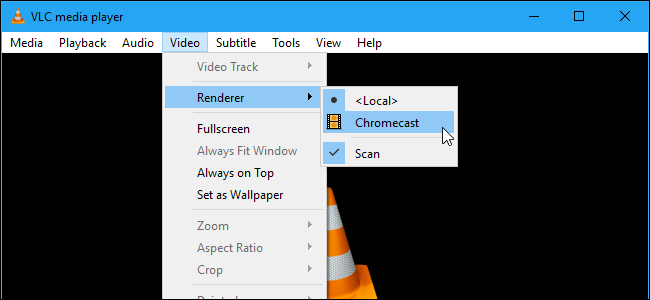
Step 1. Click on the Playback menu in VLC.
Step 2. Select the Renderer option.
Step 3. Click on Chromecast.
Part 4: Performance And Connectivity Issues Of VLC To Chromecast
In other cases, problems may be encountered during the setup. Below are some of the solutions that you can try.
Solution #1 Do you use a VPN that is PC-based? If you do, your attempt of checking for your Chromecast is probably not going to work. You should deactivate the VPN from your computer before you attempt to connect to Chromecast. It is preferable to set up the router with the recommended VPN server for the best results.
Solution #2: Make sure that both of your computer and Chromecast are on the same local network.
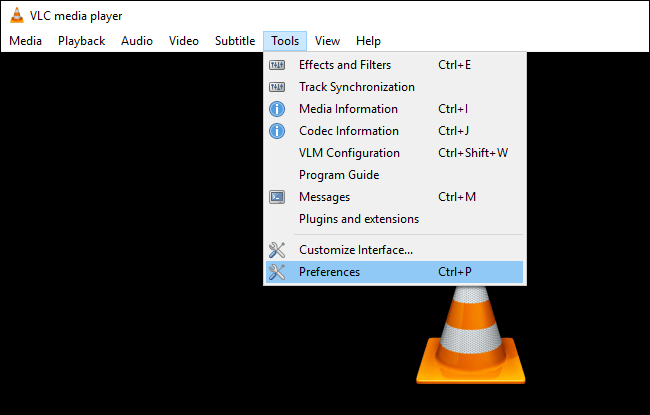
Solution #3: If your Chromecast device does not appear in the renderers list in VLC, follow these steps:
Step 1. Click on the Tools form the VLC menu.
Step 2. Select Preferences from the choices.
Step 3. Click on the Reset Preferences button.
This may seem annoying when you need to do this multiple times. However, it does the trick but the disadvantage is you will lose your set preferences.
Solution #4: Change the conversion quality.
The process of conversion might increase the video’s loading time on your TV screen. To do this, follow the steps below.
Step 1. Click on the Tools menu in VLC.
Step 2. Select Preferences from the choices.
Step 3. Click All.
Step 4. Look for the Stream Output section.
Step 5. Expand the Sout stream option.
Step 6. Select Chromecast.
Step 7. Look for the drop-down menu of Conversion quality.
Step 8. Select your desired choice to improve streaming and conversion. The options are from Low CPU (low quality but high bandwidth) to High (high quality and high bandwidth). The default option is Medium.
Step 9. Click on the Save button then check out the stream. Reload the video for the changes to apply.
Part 5: In Conclusion
To end our discussion on how to stream media files from VLC via Chromecast on your computer, here is a recap of the steps:
- Make sure that your Chromecast and Windows computer are on the same local network.
- Install the newest VLC Media Player version.
- Open the Playback menu on VLC. Select Renderer and then click Scan.
- Wait for the scan to finish then click on the Playback menu again, select Renderer and choose Chromecast.
- Accept the shown certificate and click on Play.
Enjoy watching!

30% Off >>>