


How to Burn MP4 to DVD for Free on Windows/Mac in 2026
There are actually a lot of ways to watch movies. For video lovers who are not that on-the-go and still wanted to feel the cinema vibe at home, the best option could be offline viewing using your own DVD player at home!
Have you ever wondered about the ways do to such? Well, in this article, we are to discuss and explain each of the means you can use to burn MP4 to DVD on Windows 10. Those ways are just simple!

Are you excited to learn more? Let us dig in and check.
Contents Guide Part 1. Four Tools To Burn MP4 To DVD on Windows 10Part 2. Best Converter to Burn MP4 To DVD on Windows 10 Part 3. In Conclusion
Part 1. Four Tools To Burn MP4 To DVD on Windows 10
#1: VideoSolo DVD Creator
One of the many ways to burn MP4 to DVD on Windows 10 is by using this VideoSolo DVD Creator. This is an application tool that is mainly designed and created to perform the function of burning videos to DVD. This supports lots of formats including MOV, AVI, WMV, MP4, and several other popular formats. As you are performing the process, you can be assured that the DVD video will be as good as the original and that the file will not be corrupted. What is more amazing is that this is purely compatible with Mac and of course Windows 10 computer!
These are the easy steps.
Step 1: Make sure to download the VideoSolo DVD Creator. Once done with the installation, launch the program and open it.
Step 2: Once opened, the first thing that must be done is to click the “Add Media Files” button which can easily be seen at the center of the interface. Aside from this button, you can also tick the “Add Media Files” button at the top left corner of the screen. Choosing either of two will result in the same outcome – importing of MP4 videos from your personal computer to the program.
Step 3: Once the video has been imported, you can perform editing as well by ticking on the “Magic stick ” icon at the top right corner of the interface. This is where you can perform functions like rotating, cropping, trimming, adjusting, adding of the filter and even watermarks. If you prefer adding subtitles the video, that would also be possible!
Step 4: If you have accomplished doing the above, you can now click the “Next ” button at the bottom right corner of the screen to design your DVD menu since this application offers several templates wherein you can choose from! Another amazing thing is that it allows for adding background music.
Step 5: Make sure that you have the blank DVD disc inserted on your personal computer’s drive. Once ensured, you can now click the “Next” button. The program will ask you to choose the output folder to save the DVD and ISO files. Once you are done selecting the folder, you can finally click the “Start” button in the lower right corner to begin to burn MP4 to DVD.
#2: Freemake Video Converter
You can also use Freemake Video Converter to burn MP4 to DVD on Windows 10. Since DVD players are quite old and somehow out of style, there are lots of types that do not accept videos in MP4 format. With the help of this software, the conversion becomes too easy for anyone in need. What is more fascinating is that the service can be enjoyed for free.
The following are the steps to be undertaken.
Step 1: Download and install the Freemake Video Converter on your Windows 10 personal computer.
Step 2: Launch the program.
Step 3: Click on the “+Video ” button. Select all the MP4 files that you wanted to copy to the DVD disc. You can perform dragging and dropping of MP4 videos if you prefer.
Step 4: Select the “to DVD” option from the selections you will be seeing at the bottom of the screen. You can perform video editing using this tool as well including the addition of subtitles.
Step 5: If you want to change the burning parameters, you can freely do it. You can check the below items.
- Title and name of the disc and chapters
- Menu type (text, image or custom background)
- Volume
- Aspect ratio
- Encoding system
- Audio codec
Step 6: Finally, you can hit the “Burn” button and start to burn MP4 to DVD. Just ensure that you have the blank disc inserted on the drive of your personal computer.
#3: DVD Flick (Windows)
The third method or tool to be discussed is popularly known as DVD Flick (Windows). It can conveniently burn MP4 to DVD on Windows 10. Same with Freemake Video Converter, DVD Flick also offers free service for the user.
Let us find out the detailed steps to use this software.
Step 1: The first thing to do is to have this DVD Flick downloaded and installed on your personal computer.
Step 2: Launch the program, open it, and make sure that you have your blank disc inserted your computer’s drive.
Step 3: The next step to be done is to insert an MP4 video in the software. You can either locate the file on your computer or perform the usual drag and drop process.
Step 4: Click the “Project Settings ” button which is located at the topmost part of the DVD Flick window. Upon doing this, you will land to the Setting page wherein you can perform the editing function.
Step 5: You can now proceed with clicking the “Burning ” tab which is located at the left side of the page.
Step 6: Once done, tick on the “Burn project to disc ” box to ensure that your MP4 file will be burned onto your DVD disc.
Step 7: Click the “Accept” button at the bottom of the interface to save the video settings.
Step 8: Finally, you can click the “Create DVD ” button found at the top of the window to prompt DVD Flick to begin encoding and burning your MP4 file. If you have seen a screen asking you to choose a different file name, just click Continue.
#4: Wondershare DVD Creator
The last way to be introduced to this article is this Wondershare DVD Creator. It is considered as one of the alternatives which are popularly used to burn MP4 to DVD on Windows 10. This as well supports lots of formats such as MP4, MP3, MOV, AVI, and many more.
To begin using this, you must follow below.
Step 1: Ensure that the Wondershare DVD Creator is downloaded on your Windows 10 computer.
Step 2: Have this installed, launched, and opened, to begin with, the process.
Step 3: Make sure to choose the “Create a New Project” button to start creating a new disc.
Step 4: Add the MP4 video by clicking the “+” icon seen in the middle of the screen. Dragging and dropping of the file are possible as well.
Step 5: You can perform editing and video customization if preferred. You just need to tick the “pencil-like ” button.
Step 6: By clicking the menu tab, you have the option to choose the design you want to apply. Even the background pictures and music could also be edited.
Step 7: You can see the preview of the video by going to the “Preview ” button.
Step 8: Finally, by clicking the “Burn” option from the main interface, you can now begin to burn MP4 to DVD on Windows 10.
Part 2. Best Converter to Burn MP4 To DVD on Windows 10
Upon stating the ways you can use to burn MP4 to DVD on Windows 10, you might want to check this DumpMedia Video Converter which has been used and trusted by a lot of users nowadays. Could you believe that this application is very helpful if you are looking for a tool that you can use to convert your video or even audio files to different desired formats?
This tool supports numerous formats. For instance, you can convert WebM video files to MP4 format by using this tool. Name it and DumpMedia Video Converter will do it for you! In addition, you can easily play all videos and audios and get snapshots instantly using its mini clear box if needed.
We are definitely recommending this converter for users like you.
Aside from its main function, this one is software with a user-friendly interface and offers easy steps to perform the desired processes.
Downloading and even the installation of this program could be done in just a few minutes and would require only a few clicks. You got to have your converted video by just following a few and simple steps.
To proceed with video conversion, you must do this simple step by step guide.
Step 1: Of course, you are required to ensure that this DumpMedia Video Converter would be downloaded and installed on your Windows of Mac computers.
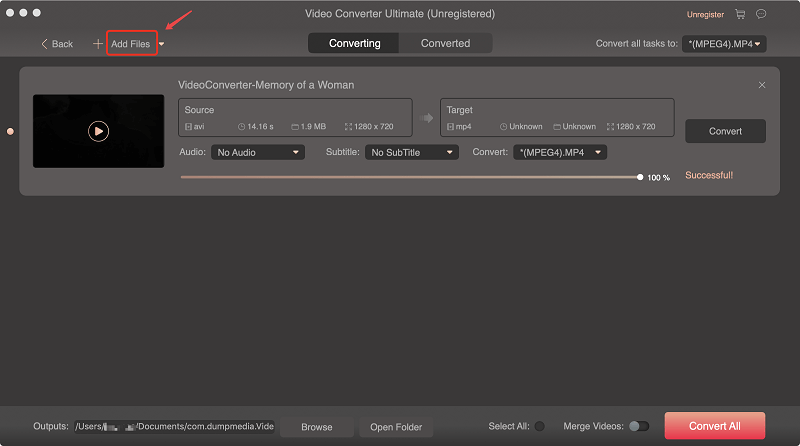
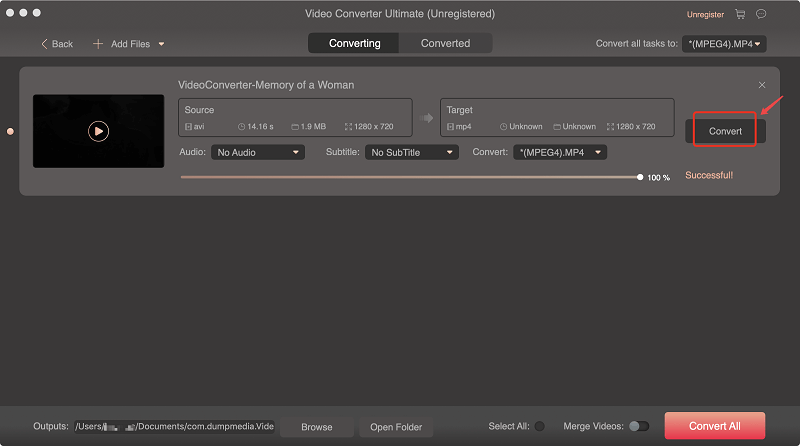
Step 2: Launch the program and click the “Add files” button to select the desired file to convert. You can as well drag and drop the files directly from the location to the application.
Step 3: Click the “Profile” button to select the format wanted.
Step 4: Once done, choose the destination folder wherein the output file would be saved.
Step 5: Click the “Convert ” button to begin with the conversion process.
Part 3. In Conclusion
Mentioned above are only some of the numerous ways you can use to burn MP4 to DVD on Windows 10. Which among these do you find the best and easiest?
Have you ever used any of these?
Let us know your feedback by leaving your thoughts on the comment section!

30% Off >>>