


So übertragen Sie die YouTube-Musikwiedergabeliste auf Spotify?
Während YouTube Music bietet eine umfangreiche Bibliothek und Videointegration, viele Benutzer fühlen sich schließlich angezogen Spotify für seine benutzerfreundliche Oberfläche, leistungsstarke Funktionen zur Musikerkennung und nahtlose Freigabeoptionen.
Wer unzählige Stunden damit verbracht hat, die perfekte Playlist auf YouTube Music zu erstellen, für den kann der Wechsel zur neuen Plattform eine Herausforderung sein. Niemand möchte seine Lieblingssongs verlieren oder Playlists komplett neu aufbauen.
Zum Glück bietet die Technologie eine Lösung. Es ist jetzt durchaus möglich, Ihre Playlists von YouTube Music auf Spotify ohne einen Takt zu verlieren. In diesem Handbuch führen wir Sie durch So übertragen Sie die YouTube Music-Wiedergabeliste auf Spotify.
Egal, ob Sie einen dauerhaften Wechsel vornehmen oder einfach nur Ihre Playlist plattformübergreifend genießen möchten, wir helfen Ihnen dabei, dies reibungslos und schnell zu bewerkstelligen.
Inhaltsverzeichnis Teil 1: Ist es möglich, YouTube Music Playlist zu übertragen auf Spotify?Teil 2: Was ist vor der Übertragung der YouTube-Musik-Playlist zu tun? Spotify?Teil 3: So übertragen Sie konvertierte YouTube-Musik-Playlists auf Spotify?Teil 4: Die abschließenden Gedanken
Teil 1: Ist es möglich, YouTube Music Playlist zu übertragen auf Spotify?
So übertragen Sie die YouTube Music-Wiedergabeliste auf SpotifyIst das möglich? Ja, das ist absolut möglich. Allerdings ist es nicht direkt über die Plattformen selbst möglich, da diese konkurrieren und keine integrierte Unterstützung für die plattformübergreifende Synchronisierung von Playlists bieten. Außerdem werden von YouTube Music Premium heruntergeladene Songs verschlüsselt durch Digitales Rechtemanagement (DRM), wodurch die Wiedergabe, auch nach dem Herunterladen, nur auf die YouTube Music-App beschränkt wird.
Um diese Songs DRM-frei zu machen und sie auf Spotifybenötigen Sie ein DRM-Entfernungstool. Mit DRM-Entfernungstools können Benutzer ihre Musik von YouTube Music herunterladen und in Formate konvertieren, die mit kompatibel sind Spotify. Sobald die Songs konvertiert und lokal gespeichert sind, können sie in Ihr Spotify Bibliothek oder eine benutzerdefinierte Wiedergabeliste.
Teil 2: Was ist vor der Übertragung der YouTube-Musik-Playlist zu tun? Spotify?
So übertragen Sie die YouTube Music-Wiedergabeliste auf Spotify? Bevor Sie mit dem Übertragungsvorgang beginnen, müssen Sie sicherstellen, dass Ihre Musikdateien zugänglich und frei von DRM-Einschränkungen sind.
Es gibt viele Tools zur DRM-Entfernung von YouTube Music, mit denen Sie problemlos DRM-freie Songs erhalten können. DumpMedia YouTube-Musikkonverter ist das Beste, das Ihnen einen integrierten YouTube Music-Webplayer bietet, mit dem Sie YouTube Music direkt in unverschlüsselte MP3, M4A-, WAV- und FLAC-Audiodateien.
Anschließend können Sie diese YouTube-Musiktitel als Audiodateien auf jedes beliebige Gerät übertragen und sie jederzeit ohne Internetverbindung abspielen. die YouTube Music App pausiert ständig, Sie können Downloads für ein besseres Erlebnis auch auf anderen Musikplayern abspielen.
Kostenlos Herunterladen Kostenlos Herunterladen
Mit der Stapelkonvertierungsfunktion können Sie DRM von einer gesamten YouTube Music-Wiedergabeliste und Alben mit nur einem Klick entfernen, und die Konvertierungsgeschwindigkeit kann bis zu 35-mal schneller sein. Besser noch: Sie können Laden Sie kostenlos Musik von YouTube herunter weil kein YouTube Music Premium-Konto erforderlich ist.
So übertragen Sie die YouTube Music-Wiedergabeliste auf Spotify? Hier finden Sie eine ausführliche Anleitung zur Verwendung DumpMedia So erhalten Sie eine DRM-freie Playlist:
Schritt 1: Laden Sie DumpMedia YouTube Music Converter. Melden Sie sich nach der Installation mit dem Programm bei Ihrem YouTube Music-Konto an.
Schritt 2: Verwenden Sie die Drag-and-Drop-Funktion, um der Benutzeroberfläche Songs, Wiedergabelisten oder Alben von YouTube Music hinzuzufügen.
![]()
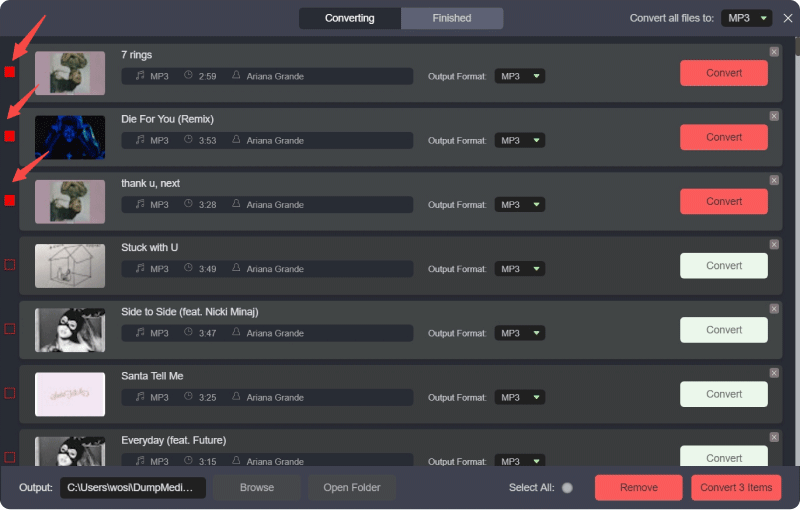
Schritt 3: Wenn alle Titel erfolgreich hinzugefügt wurden DumpMedia, müssen Sie das Konvertierungsformat aus den oben genannten auswählen. Hier wählen wir das kompatibelste Format, nämlich MP3. Sie sollten auch den Ausgabeordner für die Ergebnisse festlegen.
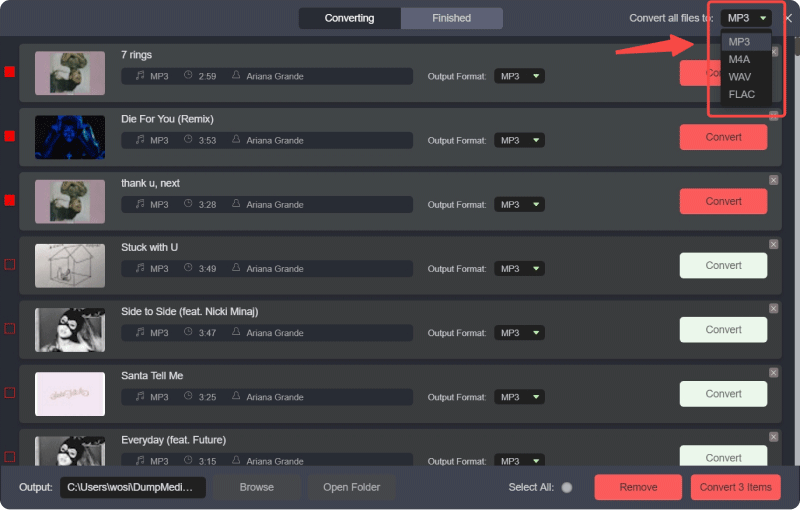
Schritt 4: Klicken Sie auf „Konvertieren“, um den Konvertierungsvorgang zu starten und die Songs in einer MP3 Format.
Teil 3: So übertragen Sie konvertierte YouTube-Musik-Playlists auf Spotify?
So übertragen Sie die YouTube Music-Wiedergabeliste auf Spotify? Wenn Sie die konvertierten YouTube Music-Songs bereits mithilfe von DumpMedia YouTube Music Converter, fahren Sie mit den Schritten zum Hochladen fort Spotify wird dann schneller sein. Lassen Sie uns nun beginnen, die Schritte zum Hochladen Ihrer Lieblings-YouTube Music-Playlist zu Spotify.
Schritt 1: Öffnen Sie den Microsoft Store auf Ihrem Windows-PC Spotify Desktop-App.
Schritt 2: Gehen Sie zu „Einstellungen“ und scrollen Sie nach unten zu „Lokale Dateien“.
Schritt 3: Aktivieren Sie „Lokale Dateien anzeigen“ und klicken Sie auf „Quelle hinzufügen“.
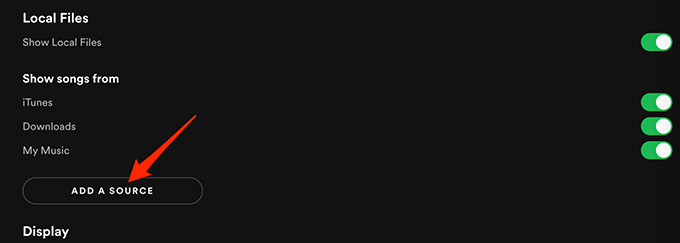
Schritt 4: Wählen Sie den Ordner aus, in dem Sie Ihre konvertierte YouTube Music-Wiedergabeliste gespeichert haben. Spotify scannt und importiert diese Dateien automatisch in Ihren Bereich „Lokale Dateien“.
Schritt 5: Um eine Wiedergabeliste zu erstellen, klicken Sie auf „Wiedergabeliste erstellen“, geben Sie ihr einen Namen und ziehen Sie die importierten Songs per Drag & Drop hinein.
So übertragen Sie die YouTube Music-Wiedergabeliste auf Spotify mit dem Handy? Wenn Sie Spotify Wenn Sie auf Ihrem Mobilgerät auf die Songs zugreifen möchten, stellen Sie sicher, dass Ihre Desktop- und mobilen Apps im selben WLAN-Netzwerk synchronisiert sind und dass Sie die Playlist auf beiden Geräten heruntergeladen haben. So können Sie Ihre konvertierte YouTube-Playlist auf Spotify jederzeit und überall.
Teil 4: Die abschließenden Gedanken
Nachdem Sie den heutigen Artikel gelesen haben, haben Sie ein klareres Verständnis davon, wie Sie YouTube Music-Wiedergabelisten übertragen können auf SpotifyDer Wechsel der Musikplattform bedeutet nicht, dass man wieder ganz von vorne anfangen muss.
Dank leistungsstarker Werkzeuge wie DumpMedia YouTube Music Converter und SpotifyDank der lokalen Dateiunterstützung von können Sie Ihre Lieblings-Playlists von YouTube Music ganz einfach übertragen. Viel Spaß beim Hören!

30 % Rabatt >>>