


Cómo grabar CD en iTunes [Guía 2026]
Muchos usuarios aún desean grabar CD para reproducirlos en el automóvil, escucharlos sin conexión, hacer copias de seguridad o crear colecciones de música personales. Si está buscando cómo grabar un CD en iTunes, la buena noticia es que iTunes La aplicación Apple Music aún permite grabar CD con archivos de audio compatibles. Sin embargo, existe una limitación importante que muchos usuarios descubren rápidamente: no todas las canciones se pueden grabar directamente en un CD en iTunes.
En esta guía, explicaremos exactamente cómo grabar un CD en iTunes, por qué algunas canciones de Apple Music no se pueden grabar y cómo convertir pistas protegidas a formatos de audio compatibles antes de grabarlas en un CD.
Guía de contenido Parte 1. Por qué algunas canciones no se pueden grabar en iTunesParte 2. Lo que necesitas antes de grabar un CD en iTunesParte 3. La mejor manera de convertir Apple Music en archivos de audio grabables.Parte 4. Cómo grabar un CD en iTunes paso a pasoParte 5. Preguntas frecuentesParte 6. Resumen
Parte 1. Por qué algunas canciones no se pueden grabar en iTunes
¿Puedes grabar canciones de Apple Music en un CD en iTunes? La respuesta depende del tipo de archivo de música que tengas. Si tus canciones son MP3Si utilizas archivos WAV o pistas compradas sin DRM, puedes grabarlas fácilmente con iTunes.
Sin embargo, las canciones en streaming de Apple Music están protegidas. Esto significa que los usuarios que intentan aprender a grabar un CD en iTunes a menudo descubren que algunas canciones no se pueden grabar directamente. Una de las mayores frustraciones al aprender a grabar un CD en iTunes es ver errores de grabación o mensajes de archivos no compatibles.
Aunque las canciones se descarguen para reproducirlas sin conexión, permanecen protegidas dentro del ecosistema de Apple Music, ya que los archivos protegidos de Apple Music no se pueden transferir libremente. Por lo tanto, las canciones de Apple Music generalmente deben convertirse a formatos de audio compatibles antes de poder grabarlas correctamente.
Parte 2. Lo que necesitas antes de grabar un CD en iTunes
Antes de seguir los pasos para grabar un CD en iTunes, asegúrese de tener lo siguiente:
- un CD virgen
- iTunes o la aplicación Apple Music instalada
- una unidad grabadora de CD/DVD
- archivos de audio compatibles (MP3, WAV, AAC, AIFF)
Si tus canciones de Apple Music aún están protegidas, normalmente es necesario convertirlas a formatos de audio estándar antes de grabarlas.
Parte 3. La mejor manera de convertir Apple Music en archivos de audio grabables.
Si quieres grabar canciones de Apple Music correctamente, primero necesitas archivos de audio locales compatibles. Una de las herramientas más fáciles para esto es DumpMedia Apple Music ConverterPermite a los usuarios convertir su biblioteca de Apple Music a varios formatos de audio, como MP3, AAC, WAV y FLAC para reproducción sin conexión en cualquier dispositivo. Incluso si el La aplicación Apple Music no funciona. En tu dispositivo, puedes reproducirlos inmediatamente en otro reproductor de música.
Descargar gratis Descargar gratis
Características principales
- Convertir música de Apple a MP3WAV, AAC y más
- Mantener una calidad de audio sin pérdidas
- Conversión por lotes para listas de reproducción y álbumes
- Rápida velocidad de conversión
DumpMedia Apple Music Converter no graba CDs directamente. En su lugar, convierte las canciones protegidas de Apple Music a formatos que posteriormente se pueden grabar con iTunes. Este método es la solución más práctica para quienes buscan cómo grabar CDs con pistas de Apple Music en iTunes.
Paso a paso: Convertir Apple Music a MP3
Paso 1: Descarga e instala el software en tu ordenador. Funciona con ambos. WinWindows y Mac. La interfaz es fácil de usar, lo que la hace fácil para principiantes.
Descargar gratis Descargar gratis
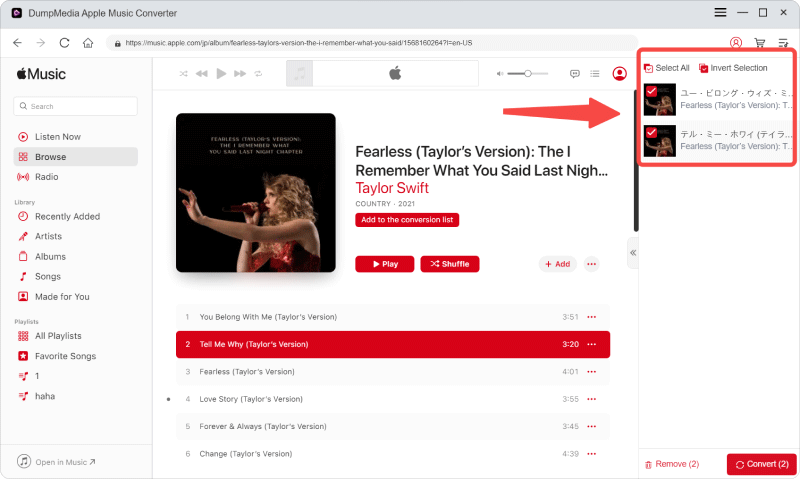
Paso 2: Abra el reproductor web de Apple Music integrado en el interior. DumpMedia Inicia sesión con tu cuenta de Apple Music. Explora Apple Music y arrastra las canciones, álbumes o listas de reproducción que quieras descargar al convertidor.
Paso 3: En el panel de configuración, seleccione MP3 como formato de salida para permitir una MP3 Descarga de tus pistas seleccionadas.
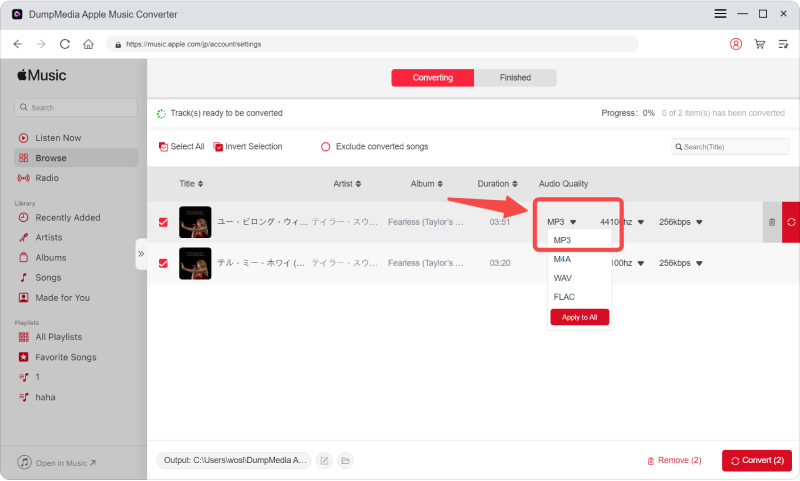
Paso 4: Haz clic en Convertir y descarga las canciones directamente como MP3 archivos.

Parte 4. Cómo grabar un CD en iTunes paso a paso
Tras preparar los archivos de música compatibles, sigue estos pasos para aprender a grabar un CD en iTunes.
Paso 1: Inicia iTunes en Wino abre la aplicación Apple Music en tu Mac.
Paso 2: Crea una nueva lista de reproducción y añade todas las canciones que quieras grabar.
Paso 3: Inserta un CD-R o CD-RW virgen en la unidad de disco de tu ordenador.
Paso 4: Haz clic derecho en la lista de reproducción y selecciona "Grabar lista de reproducción en disco". Este es el paso principal para grabar un CD en iTunes.
Paso 5: Puedes elegir CD de audio, MP3 CD o CD/DVD de datos. La mayoría de los usuarios selecciona CD de audio para reproductores de CD estándar.
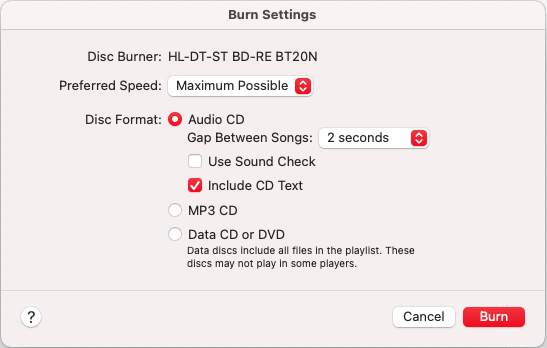
Paso 6: Haz clic en “Grabar” y espera a que iTunes finalice el proceso. Ahora tu CD está listo para escucharse sin conexión.
Parte 5. Preguntas frecuentes
¿Cuál es el mejor formato de audio para grabar CDs en iTunes?
Al aprender a grabar CD en iTunes, es importante elegir el formato correcto. Los formatos recomendados son: MP3, WAV, AAC y AIFF. MP3 Suele ser la opción más compatible para el almacenamiento y la reproducción. Esta es otra razón por la que muchos usuarios convierten las pistas de Apple Music antes de grabarlas en un CD.
¿Por qué iTunes no puede grabar algunas canciones de Apple Music?
Las pistas de Apple Music están protegidas y es posible que requieran conversión a formatos de audio compatibles antes de grabarlas.
¿iTunes todavía permite grabar CD?
Sí. iTunes y la aplicación Apple Music aún permiten grabar CD con archivos de audio locales compatibles.
Parte 6. Resumen
Aprender a grabar CD en iTunes sigue siendo útil para los usuarios que desean reproducir música sin conexión, realizar copias de seguridad permanentes o tener colecciones de música fuera de las plataformas de streaming. Si bien las canciones de Apple Music no siempre se pueden grabar directamente debido a restricciones de protección, convertirlas a archivos de audio locales compatibles facilita y flexibiliza considerablemente la grabación de CD.
Descargar gratis Descargar gratis
*DumpMedia Funciona descifrando y descargando las canciones de Apple Music en archivos sin DRM, lo que te permite obtener una copia limpia y sin restricciones de tu biblioteca para cualquier dispositivo. Su funcionalidad no incluye la eliminación del DRM de los archivos de audio locales.

30% de descuento >>>