


YouTube Music 재생목록을 전송하는 방법 Spotify?
DaVinci에는 YouTube 뮤직 광범위한 라이브러리와 비디오 통합을 제공하므로 많은 사용자가 결국 끌리게 됩니다. Spotify 사용자 친화적인 인터페이스, 강력한 음악 검색 기능, 원활한 공유 옵션 덕분에 인기가 많습니다.
YouTube Music에서 완벽한 플레이리스트를 만드는 데 수많은 시간을 투자했다면, 플랫폼을 바꾸는 것은 부담스러울 수 있습니다. 좋아하는 곡을 잃거나 플레이리스트를 처음부터 다시 만들고 싶은 사람은 아무도 없을 테니까요.
다행히 기술이 해결책을 제공합니다. 이제 YouTube Music에서 재생목록을 다른 기기로 전송하는 것이 완전히 가능해졌습니다. Spotify 비트를 잃지 않고. 이 가이드에서는 다음 단계를 안내해 드리겠습니다. YouTube Music 재생목록을 다음으로 전송하는 방법 Spotify.
영구적으로 전환하든, 여러 플랫폼에서 플레이리스트를 즐기고 싶든, 우리는 원활하고 빠르게 전환할 수 있도록 도와드리겠습니다.
컨텐츠 가이드 1부: YouTube 음악 재생 목록을 다른 곳으로 전송할 수 있습니까? Spotify?2부: YouTube 음악 재생목록을 전송하기 전에 해야 할 일 Spotify?3부: 변환된 YouTube 음악 재생 목록을 전송하는 방법 Spotify?4부: 마무리 생각
1부: YouTube 음악 재생 목록을 다른 곳으로 전송할 수 있습니까? Spotify?
YouTube Music 재생목록을 다른 곳으로 전송하는 방법 Spotify? 가능할까요? 네, 물론 가능합니다. 하지만 플랫폼 자체를 통해 직접 할 수는 없습니다. 경쟁사이고 크로스 플랫폼 재생목록 동기화를 기본적으로 지원하지 않기 때문입니다. 게다가 YouTube Music Premium에서 다운로드한 노래는 디지털 권한 관리 (DRM)다운로드한 경우에도 YouTube Music 앱에서만 재생이 제한됩니다.
이 노래를 DRM 없이 전송하려면 SpotifyDRM 제거 도구가 필요합니다. DRM 제거 도구를 사용하면 사용자가 YouTube Music에서 음악을 다운로드하여 호환되는 형식으로 변환할 수 있습니다. Spotify. 노래가 변환되어 로컬에 저장되면 이를 가져올 수 있습니다. Spotify 라이브러리나 사용자 정의 재생목록.
2부: YouTube 음악 재생목록을 전송하기 전에 해야 할 일 Spotify?
YouTube Music 재생목록을 다른 곳으로 전송하는 방법 Spotify? 전송 과정을 시작하기 전에 음악 파일에 액세스할 수 있고 DRM 제한이 없는지 확인해야 합니다.
DRM 없는 노래를 쉽게 얻는 데 도움이 되는 YouTube Music DRM 제거 도구가 많이 있습니다. DumpMedia YouTube 음악 변환기 YouTube Music을 암호화되지 않은 파일로 직접 변환할 수 있는 내장 YouTube Music 웹 플레이어를 제공하는 최고의 제품입니다. MP3, M4A, WAV 및 FLAC 오디오 파일.
그 후에는 YouTube Music 노래를 오디오 파일로 모든 기기에 전송하여 인터넷 없이도 언제든지 재생할 수 있습니다. YouTube Music 앱이 계속 일시 중지됩니다, 더 나은 경험을 위해 다른 음악 플레이어에서 다운로드한 음악을 재생할 수도 있습니다.
일괄 변환 기능을 사용하면 클릭 한 번으로 전체 YouTube Music 재생목록과 앨범의 DRM을 제거할 수 있으며, 변환 속도는 최대 35배 빨라집니다. 더 좋은 점은 YouTube에서 무료로 음악을 다운로드하세요 YouTube Music Premium 계정이 필요하지 않기 때문입니다.
YouTube Music 재생목록을 다른 곳으로 전송하는 방법 Spotify? 사용 방법에 대한 자세한 가이드는 다음과 같습니다. DumpMedia DRM 없는 재생 목록을 얻으려면:
1 단계 : 다운로드 및 설치 DumpMedia YouTube Music Converter. 설치 후, 프로그램을 사용하여 YouTube Music 계정에 로그인합니다.
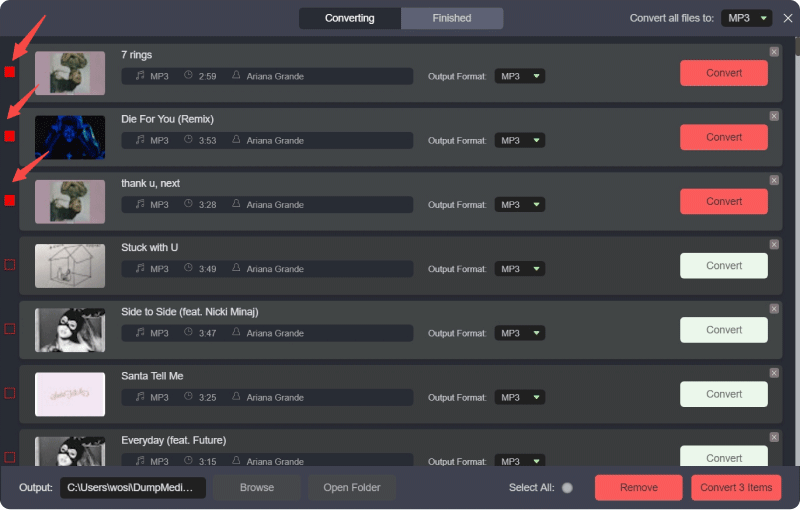
2 단계 : 드래그 앤 드롭 기능을 사용하여 YouTube Music 노래나 재생 목록, 앨범을 인터페이스에 추가하세요.
![]()
3 단계 : 모든 트랙이 성공적으로 추가되면 DumpMedia, 위에 언급된 변환 형식 중에서 하나를 선택해야 합니다. 여기서는 가장 호환되는 형식을 선택합니다. MP3. 결과에 대한 출력 폴더도 설정해야 합니다.
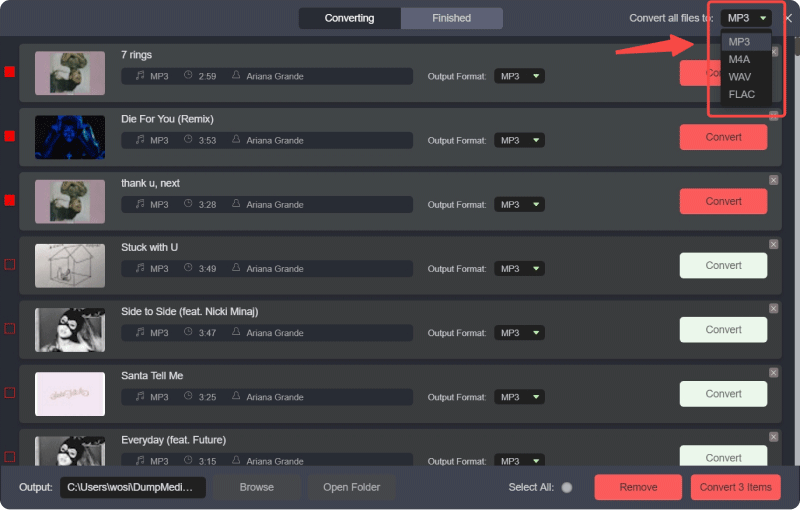
4 단계 : 변환을 클릭하여 노래를 다음 형식으로 변환 프로세스를 시작합니다. MP3 형식입니다.
3부: 변환된 YouTube 음악 재생 목록을 전송하는 방법 Spotify?
YouTube Music 재생목록을 다른 곳으로 전송하는 방법 Spotify? 이미 YouTube Music 노래를 변환한 경우 DumpMedia YouTube Music Converter를 사용하여 업로드 단계를 진행합니다. Spotify 그러면 더 빨라질 것입니다. 이제 좋아하는 YouTube Music 재생목록을 업로드하는 단계를 시작해 보겠습니다. Spotify.
1 단계 열기 Spotify 데스크톱 앱.
2 단계 설정으로 가서 로컬 파일까지 아래로 스크롤합니다.
3 단계 "로컬 파일 표시"를 켜고 소스 추가를 클릭합니다.
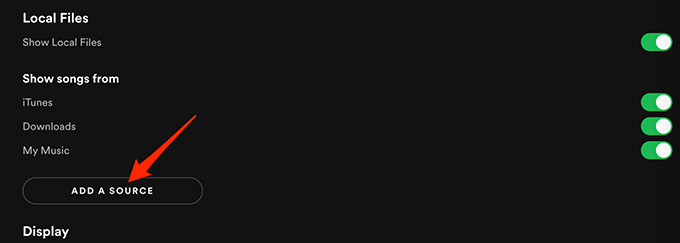
4 단계 변환된 YouTube Music 재생목록을 저장한 폴더를 선택하세요. Spotify 자동으로 해당 파일을 스캔하여 로컬 파일 섹션으로 가져옵니다.
5 단계 재생 목록을 만들려면 재생 목록 만들기를 클릭하고 이름을 지정한 다음 가져온 노래를 끌어서 놓습니다.
YouTube Music 재생목록을 다른 곳으로 전송하는 방법 Spotify 휴대폰을 사용하시나요? 사용 중이라면 Spotify 모바일에서 이 노래에 액세스하려면 데스크톱과 모바일 앱이 동일한 Wi-Fi 네트워크에 동기화되어 있고 두 기기 모두에 재생목록을 다운로드했는지 확인하세요. 이렇게 하면 변환된 YouTube 재생목록을 다음 기기에서 즐길 수 있습니다. Spotify 언제나 어디서나.
4부: 마무리 생각
오늘의 기사를 읽은 후 YouTube Music 재생 목록을 전송하는 방법에 대해 더 명확하게 이해하셨습니까? Spotify음악 플랫폼을 바꾼다고 해서 처음부터 다시 시작해야 하는 것은 아닙니다.
다음과 같은 강력한 도구 덕분에 DumpMedia YouTube 음악 변환기 및 Spotify로컬 파일 지원으로 좋아하는 YouTube Music 재생목록을 간편하게 전송할 수 있습니다. 즐거운 음악 감상 되세요!

30% 할인 >>>