


이용 방법 DumpMedia Spotify 재생 목록 백업
관리 Spotify playlists can be challenging when you want to keep a backup of your carefully organized music collections. DumpMedia Spotify Playlist Backup provides a convenient way to back up your Spotify playlists, export playlist information to CSV files, and restore playlists to your Spotify 계정입니다.
This guide explains how to connect your Spotify account, select playlists, export backup files, restore playlists, manage backup history, and customize the output folder. It also includes troubleshooting suggestions to help you handle common issues.
컨텐츠 가이드 파트 1. 설치 및 등록 DumpMedia 모든 음악 변환기파트 2. 연결 방법 Spotify 계정Part 3. How to Select a Spotify 재생 목록Part 4. Common Issues and Troubleshooting자주 묻는 질문
파트 1. 설치 및 등록 DumpMedia 모든 음악 변환기
1 : 다운로드 및 설치 DumpMedia 모든 음악 변환기
DumpMedia Any Music Converter는 Mac에서 지원됩니다. Win현재 Dows 장치에 대한 설치 패키지를 다운로드할 수 있습니다. 제품 페이지에서 다운로드하거나 여기에 제공된 다운로드 버튼을 클릭하여 다운로드할 수 있습니다.
2 : Launch DumpMedia 모든 음악 변환기
설치 후 열기 DumpMedia 컴퓨터에 설치된 모든 음악 변환 프로그램을 사용해 보세요. 처음 사용하는 사용자도 쉽게 변환할 수 있도록 깔끔하고 직관적인 인터페이스가 제공됩니다.
Tip: Make sure you're connected to the internet for the best experience.
Step 3: Register and Activate Any Music Converter
실행 DumpMedia Any Music Converter. Click the "login in" button or profile icon in the bottom left corner. Enter the email address and password. Click "Sign in" to complete the registration.
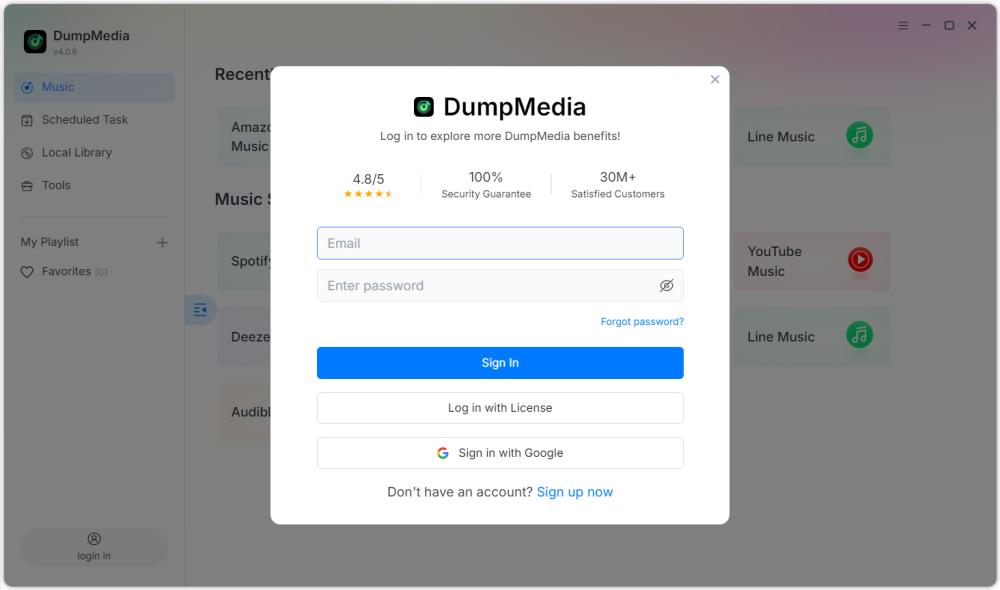
Tip: Unlock Spotify Playlist Backup by 제품 페이지 방문 and buying the plan. Choose a subscription plan that fits your needs, and don't hesitate to contact our customer service team to ask about exclusive discounts.
파트 2. 연결 방법 Spotify 계정
Before selecting a playlist, you need to connect your Spotify ~에 계정 DumpMedia Spotify Playlist Backup.
Tip: Please note that Spotify Playlist Backup is sold as a standalone item and is not included in any standard Music Converter subscription plans.
1 : Launch DumpMedia Spotify 재생 목록 백업
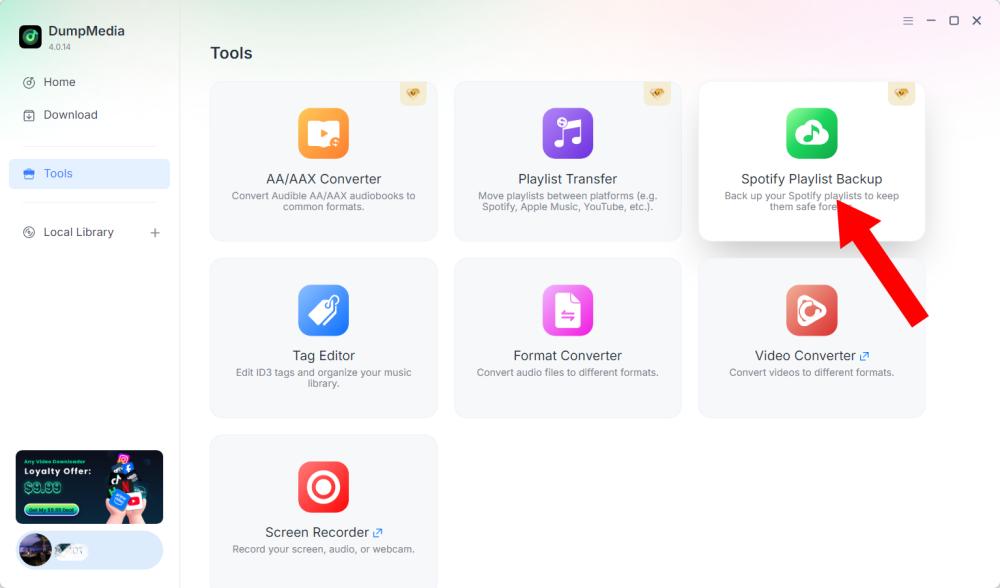
Open Any Music Converter. Choose Tools > Spotify Playlist Backup.
Step 2: Click "Connect to Spotify"
Find and click the Connect to Spotify button in the software interface. The application will automatically redirect you to the built-in Spotify 플레이어.
3단계: 연결 Spotify 계정
때 Spotify player opens inside the software, follow the available prompts to connect your Spotify account. Complete the connection process before proceeding to playlist management. Once your Spotify account is connected successfully, you can access your available playlists and select the operation you need.
Tip: If the connection does not proceed as expected, check your internet connection and confirm that the Spotify player has opened correctly.
Part 3. How to Select a Spotify 재생 목록
연결 후 Spotify account, you can select the playlist you want to back up or restore.
Step 1: Access Your Playlists
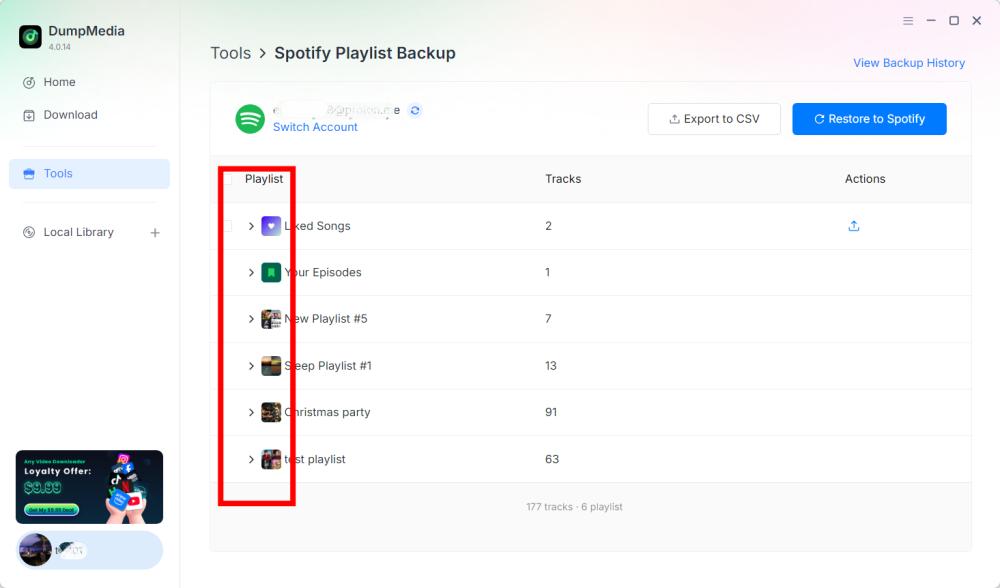
Open the playlist section in DumpMedia Spotify Playlist Backup after connecting your Spotify account. Your available playlists should be displayed in the interface.
Step 2: Choose a Playlist
Choose the playlist carefully, especially if you have multiple playlists with similar names.
Step 3: Select an Operation
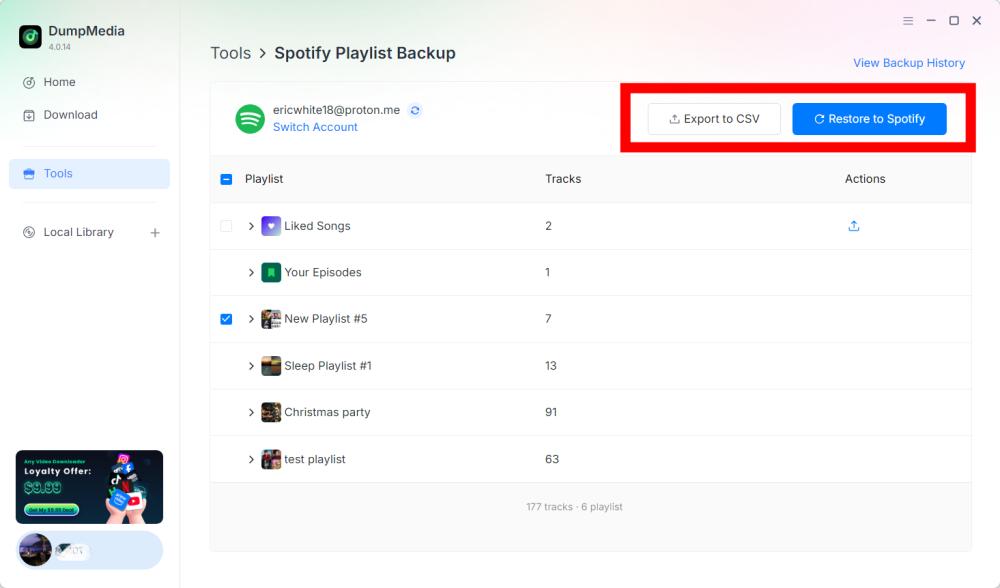
After selecting a playlist, choose the corresponding operation according to your requirements. The available operations include Export to CSV and Restore to Spotify.
- Export to CSV: Exporting a playlist to CSV allows you to save playlist information in a file that can be opened and reviewed using spreadsheet applications such as Microsoft Excel.
- 에 복원 Spotify: DumpMedia Spotify Playlist Backup supports playlist restoration through the Restore to Spotify 옵션을 선택합니다.
Step 4: Check the Exported File
DumpMedia Spotify Playlist Backup saves backup files in its default folder. You can change this location through the Preferences menu. After the export is complete, locate the generated CSV file. You can open the file using a compatible spreadsheet application to review its contents.
Important: The specific fields included in the CSV file should be confirmed according to the current version of DumpMedia Spotify Playlist Backup.
5 단계 : 확인 Spotify 계정
If you choose Restore to Spotify, 열다 Spotify and check whether the playlist has been restored successfully.
Note: Restoration results may depend on the backup data, Spotify account connection, and the software's current restoration capabilities. The exact handling of unavailable or changed tracks requires confirmation from the product documentation.
6 단계 : View Backup History
DumpMedia Spotify Playlist Backup includes a View Backup History option that allows you to review your backup records. Find View Backup History in the top-right corner of the software interface. Click the option to open the backup history section.
Part 4. Common Issues and Troubleshooting
The following troubleshooting suggestions address general issues that may occur during account connection, playlist operations, or file management. They are not confirmed product-specific error codes or official fixes.
Unable to Connect to Spotify
제안된 솔루션:
- 인터넷 연결을 확인하십시오.
- 닫고 다시 열기 DumpMedia Spotify Playlist Backup.
- Click Connect to Spotify 또.
- Complete the connection process in the built-in Spotify 플레이어.
If the issue continues, record the exact error message and contact DumpMedia Support (support@dumpmedia.COM).
Playlists Are Not Displayed
제안된 솔루션:
- 해당 Spotify account is connected.
- Reopen the playlist section.
- Restart the software and try again.
- Check whether the issue affects all playlists or only a specific playlist.
If the problem persists, provide the affected playlist details and any available error information to Support.
- 프로그램 오른쪽 상단의 메뉴를 클릭하고 "피드백 보내기"를 선택하세요.
- 문제를 설명하고 라이선스 키를 텍스트 상자에 입력하세요.
- 마지막으로 제출하기 전에 "로그 파일 첨부" 확인란을 선택해 주세요.
Export to CSV Does Not Complete
제안된 솔루션:
- 해당 Spotify account is connected.
- Try exporting the playlist again.
- Check the configured output folder in Preferences.
- Verify that the destination folder is accessible.
- Test the export with another playlist if possible.
If the export continues to fail, save the error message and contact customer support.
에 복원 Spotify 작동하지 않음
제안된 솔루션:
- 다시 연결하세요 Spotify 계정입니다.
- Check that you selected the correct playlist or backup record.
- Try the restoration process again.
- 엽니다 Spotify and check whether the playlist was partially restored.
- 문의하기 DumpMedia Support if the issue continues.
Do not assume that repeatedly restoring the same backup is safe in every situation. Check the resulting playlist before attempting additional restoration operations.
자주 묻는 질문
Q1. 어떻게 연결하나요? Spotify ~에 계정 DumpMedia Spotify Playlist Backup?
Click Connect to Spotify. The software will automatically open the built-in Spotify player, where you can connect your Spotify 계정입니다.
Q2. Can I export Spotify playlists to CSV?
Yes. After connecting your Spotify account and selecting a playlist, choose Export to CSV to create a backup file.
Q3. Can I restore a playlist to Spotify?
예. DumpMedia Spotify Playlist Backup provides a Restore to Spotify option for supported restoration operations.
Q4. Where are my backup files saved?
Backup files are saved in the default output folder. You can check or change the location by opening the top-right menu, selecting Preferences, and locating Output Folder.
Q5. How can I view previous backup records?
Click View Backup History in the top-right corner of the software to review available backup history.
Q6. 나는 무엇을해야합니까? Spotify cannot connect?
Check your internet connection, and reopen the software. If the problem persists, contact DumpMedia Support with the error details.
Q7. What should I do if my playlist is missing?
귀하의 Spotify account is connected, restart the software, and check the playlist section again. If the playlist remains unavailable, contact Support.
Q8. Can I restore a backup to a different Spotify 계정?
This feature is not yet available in the current version, but please stay tuned for future updates.