


Come masterizzare CD su iTunes [Guida 2026]
Molti utenti desiderano ancora masterizzare CD per la riproduzione in auto, l'ascolto offline, i backup o le collezioni musicali personali. Se stai cercando come masterizzare un CD su iTunes, la buona notizia è che iTunes L'app Apple Music supporta ancora la masterizzazione di CD per i file audio compatibili. Tuttavia, esiste un limite importante che molti utenti scoprono rapidamente: non tutti i brani possono essere masterizzati direttamente su CD tramite iTunes.
In questa guida spiegheremo esattamente come masterizzare un CD su iTunes, perché alcuni brani di Apple Music non possono essere masterizzati e come convertire le tracce protette in formati audio compatibili prima di masterizzarle su CD.
Guida ai contenuti Parte 1. Perché alcune canzoni non possono essere masterizzate su iTunesParte 2. Cosa serve prima di masterizzare un CD su iTunesParte 3. Il modo migliore per convertire Apple Music in file audio masterizzabiliParte 4. Come masterizzare un CD su iTunes passo dopo passoParte 5. Domande frequentiParte 6. Sommario
Parte 1. Perché alcune canzoni non possono essere masterizzate su iTunes
È possibile masterizzare brani di Apple Music su un CD tramite iTunes? La risposta dipende dal tipo di file musicale in tuo possesso. Se i tuoi brani sono MP3Se si tratta di file WAV o di brani acquistati senza DRM, è possibile masterizzarli facilmente utilizzando iTunes.
Tuttavia, i brani in streaming su Apple Music sono protetti. Ciò significa che gli utenti che cercano di imparare a masterizzare un CD su iTunes spesso scoprono che alcuni brani non possono essere masterizzati direttamente. Una delle maggiori frustrazioni quando si impara a masterizzare un CD su iTunes è la comparsa di errori di masterizzazione o messaggi relativi a file non supportati.
Anche se i brani vengono scaricati per la riproduzione offline, rimangono comunque protetti all'interno dell'ecosistema Apple Music, poiché i file protetti di Apple Music non possono essere trasferiti liberamente. Di conseguenza, i brani di Apple Music devono solitamente essere convertiti in formati audio compatibili prima di poter essere masterizzati correttamente.
Parte 2. Cosa serve prima di masterizzare un CD su iTunes
Prima di seguire i passaggi per masterizzare un CD su iTunes, assicurati di avere:
- un CD vuoto
- App iTunes o Apple Music installata
- un masterizzatore CD/DVD
- file audio compatibili (MP3, WAV, AAC, AIFF)
Se i brani di Apple Music sono ancora protetti, di solito è necessario convertirli in formati audio standard prima di masterizzarli.
Parte 3. Il modo migliore per convertire Apple Music in file audio masterizzabili
Se vuoi masterizzare correttamente i brani di Apple Music, devi prima avere a disposizione file audio locali compatibili. Uno degli strumenti più semplici per farlo è DumpMedia Apple Music ConverterConsente agli utenti di convertire la propria libreria Apple Music in vari formati audio come MP3, AAC, WAV e FLAC per la riproduzione offline su qualsiasi dispositivo. Anche se il L'app Apple Music non funziona sul tuo dispositivo, puoi riprodurli immediatamente su un altro lettore musicale.
Funzionalità principali
- Converti Apple Music in MP3, WAV, AAC e altro
- Mantieni una qualità audio senza perdite
- Conversione in batch di playlist e album
- Velocità di conversione veloce
DumpMedia Apple Music Converter non masterizza direttamente i CD. Converte invece i brani protetti di Apple Music in formati che possono essere masterizzati successivamente tramite iTunes. Questo metodo rappresenta la soluzione più pratica per gli utenti che desiderano masterizzare un CD con brani di Apple Music utilizzando iTunes.
Procedura dettagliata: convertire Apple Music in MP3
Passo 1: Scarica e installa il software sul tuo computer. Funziona con entrambi Windows e Mac. L'interfaccia è intuitiva, il che la rende adatta anche ai principianti.
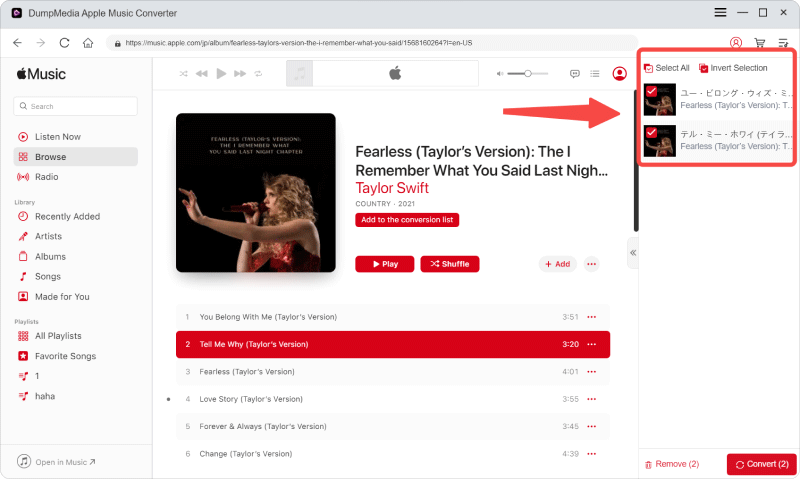
Passo 2: Apri il lettore web Apple Music integrato all'interno DumpMedia Accedi con il tuo account Apple Music. Esplora Apple Music e trascina i brani, gli album o le playlist che desideri scaricare nel convertitore.
Passo 3: Nel pannello delle impostazioni, selezionare MP3 come formato di output per consentire un MP3 Scarica i brani che hai selezionato.
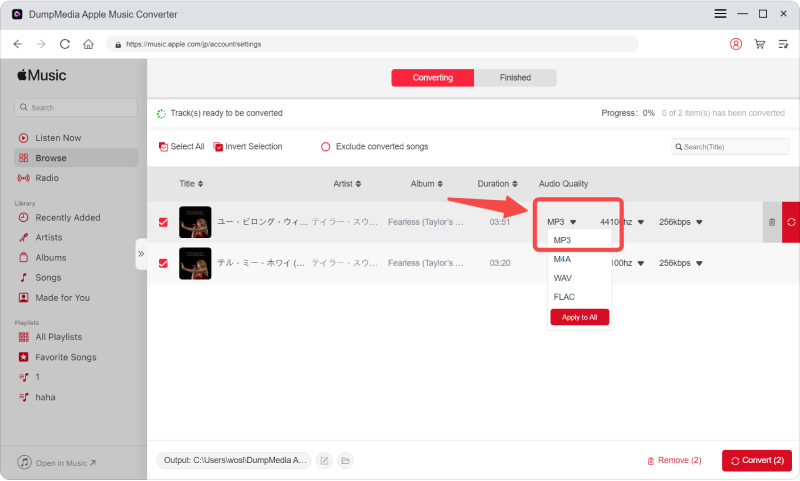
Passo 4: Fai clic su Converti e scarica i brani direttamente come MP3 File.

Parte 4. Come masterizzare un CD su iTunes passo dopo passo
Dopo aver preparato i file musicali compatibili, segui questi passaggi per imparare come masterizzare un CD su iTunes.
Passo 1: Avvia iTunes su Winscarica o apri l'app Apple Music sul Mac.
Passo 2: Crea una nuova playlist e aggiungi tutti i brani che desideri masterizzare.
Passo 3: Inserisci un CD-R o CD-RW vuoto nell'unità disco del computer.
Passo 4: Fai clic con il pulsante destro del mouse sulla playlist e scegli "Masterizza playlist su disco". Questo è il passaggio principale per masterizzare un CD su iTunes.
Passo 5: Puoi scegliere CD audio, MP3 CD o CD/DVD dati. La maggior parte degli utenti sceglie CD audio per i lettori CD standard.
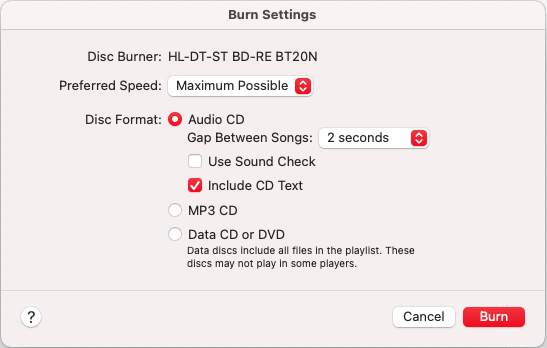
Passo 6: Fai clic su "Masterizza" e attendi che iTunes completi il processo. Ora il tuo CD è pronto per l'ascolto offline.
Parte 5. Domande frequenti
Qual è il formato audio migliore per masterizzare CD su iTunes?
Quando si impara a masterizzare un CD su iTunes, è importante scegliere il formato giusto. I formati consigliati sono: MP3, WAV, AAC e AIFF. MP3 Solitamente è l'opzione più compatibile per l'archiviazione e la riproduzione. Questo è un altro motivo per cui molti utenti convertono i brani di Apple Music prima di masterizzarli su CD.
Perché iTunes non riesce a masterizzare alcuni brani di Apple Music?
I brani di Apple Music sono protetti e potrebbero richiedere la conversione in formati audio compatibili prima di poter essere masterizzati.
iTunes supporta ancora la masterizzazione di CD?
Sì. iTunes e l'app Apple Music supportano ancora la masterizzazione di CD per file audio locali compatibili.
Parte 6. Sommario
Imparare a masterizzare CD su iTunes è ancora utile per gli utenti che desiderano la riproduzione offline, backup permanenti o collezioni musicali al di fuori delle piattaforme di streaming. Sebbene i brani di Apple Music non possano sempre essere masterizzati direttamente a causa di restrizioni di protezione, convertirli in file audio locali compatibili rende la masterizzazione di CD molto più semplice e flessibile.
*DumpMedia Questo strumento funziona decrittografando e scaricando i brani di Apple Music in file privi di DRM, consentendo di ottenere una copia pulita e senza restrizioni della propria libreria per qualsiasi dispositivo. La sua funzionalità non include la rimozione del DRM dai file audio locali.

Sconto del 30% >>>